1. Log onto Wedg-EXCH-Prod via ScreenConnect
2. Open Active Directory Users and Computers
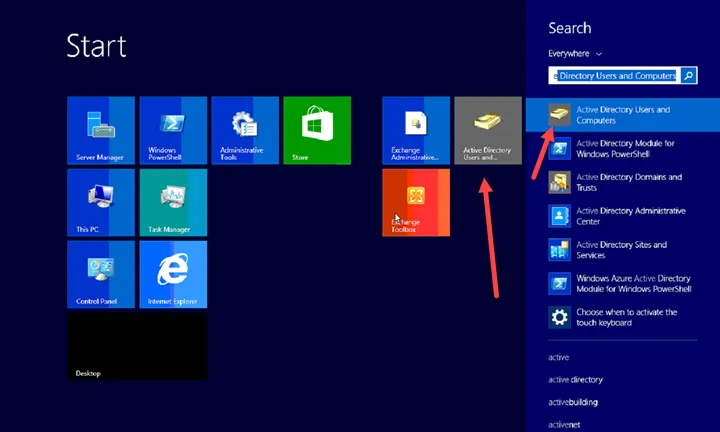
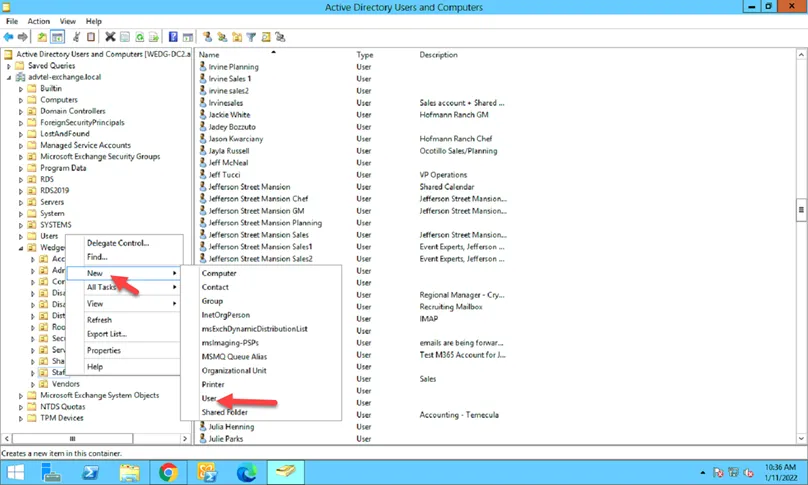
3. In advtel-exchange.local, go to OU Wedgewood -> Staff, then right-click and select New -> User
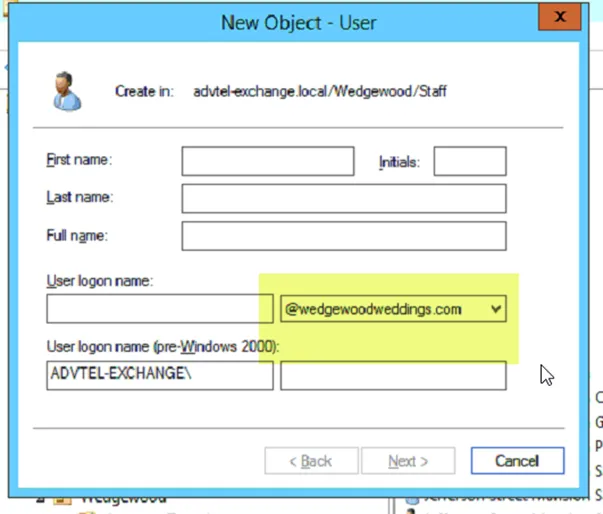
4. Fill out the information and make sure the drop-down menu option on the User Logon name field is set to FirstnameLastinitial(eg:janed)@Wedgewoodweddings.com
5. Use the password format of: [ZGF][Year][User First/Last Initials Lowercase][!]
6. Once you click Next, the user account will be created
7. Find the account and go into the properties of it and update the email field to the suggested email address from the IT form
8. Go into Attribute Editor (if you don’t see the tab here, you can do Start –> Run, type in adsiedit.msc, and hit enter to access it)
9. Find the field for proxyAddresses; if it’s not populated already with the correct information for the email address, highlight and click on Edit
10. Put in SMTP:
11. Please note that SMTP has to be capitalized for the primary email address (as stated in the IT form). Any email aliases will use smtp: syntax in front of the email address
12. Click Add
13. You should then see something like this:
14. Click OK
15. You should see the attribute added now
16. Click Apply
17. Update the Description and Office of the user based on what’s on the IT form and click Apply
18. Please do the same on the Organization tab as well
19. Add user to the AllStaff group and other groups as stated in the IT form on the Member of tab
20. ** PLEASE NOTE THE NEXT SECTION ONLY APPLIES TO THE SITE THAT HAVE NOT BEEN MIGRATED OVER TO M365. ** For sites that have been migrated to M365, skip to step 29.
21. Create the new user from the OnPrem EAC by accessing the EAC from here:
22. Click on Mailboxes -> + -> User mailbox
23. Click on Existing user and then Browse
24. In the pop up box, select the newly created user and then click OK. Once the user shows up in the User Mailbox window, click OK again
25. Once created, please look at the newly created mailbox and confirm if the primary email address is correct or not
26. Set the Full Access and Send As permissions to the mailbox as suggested in the IT form
27. You can do that by looking up the mailbox the new user needs access to, click on Mailbox Delegation, and add the new user to this accordingly
28. ** FOR SITES THAT HAS BEEN MIGRATED ONTO M365**
29. Log on M365
30. Assign the license to the newly created user
31. To do this, you would select M365 Business Premium. If there’s no license left, please go ahead and click on the check box and it will ask you to confirm for the license purchase; you can then purchase it directly from there. It has been pre-approved for purchase on the fly
32. Once you have assigned the license, please wait for the mailbox to be generated
33. Go to the shared mailbox or any mailboxes requested for access
34. Add the Full Access and Send As access as requested
35. Add the user’s mailbox to the groups requested
36. Start up Exchange Management Shell
37. You can also access it here:
38. Copy this line into Exchange Management Shell:
a. Set-DynamicDistributionGroup -Identity allstaff@wedgewoodweddings.com -RecipientContainer advtel-exchange.local/Wedgewood/Staff -RecipientFilter {(RecipientType -eq ‘UserMailbox’) -or (RecipientType -eq ‘MailUser’) -or (RecipientType -eq ‘MailContact’)}
b. Hit Enter
39. Then copy this line in:
a. Get-DistributionGroupMember -identity “AllStaff” > C:\temp\output.txt
b. Open up the .txt file and search for the user you have added just now to confirm it’s in there