Purpose:
Section titled “Purpose:”To provide the steps needed for employees to submit an expense report in order to be reimbursed for business expenses incurred by the employee
Scope:
Section titled “Scope:”For any employee that needs to submit an expense report for reimbursement
Responsibility:
Section titled “Responsibility:”Accounting All
Completion Criteria:
Section titled “Completion Criteria:”The Nexonia expense report is submitted. A report is considered submitted when a blue greater than symbol (>) appears in the status column for the report in Nexonia.
Records:
Section titled “Records:”An expense report in Nexonia
Steps:
Section titled “Steps:”Due on the last business day of the month and only submit one expense report per month. Reimbursements will be initiated within the first 5 business days of the following month. Step 1: On your Nexonia (online) homepage, click the Expenses tab.
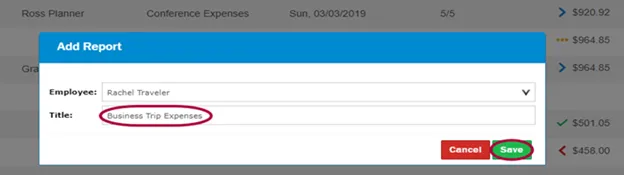
Step 2: Click Add Report.
Step 3: Enter a Title (Title format: March 2024) for your new report and click Save.
Step 4: Your expense report is created. From here, add expenses and receipts.
Step 5: Click Add Expense Item.

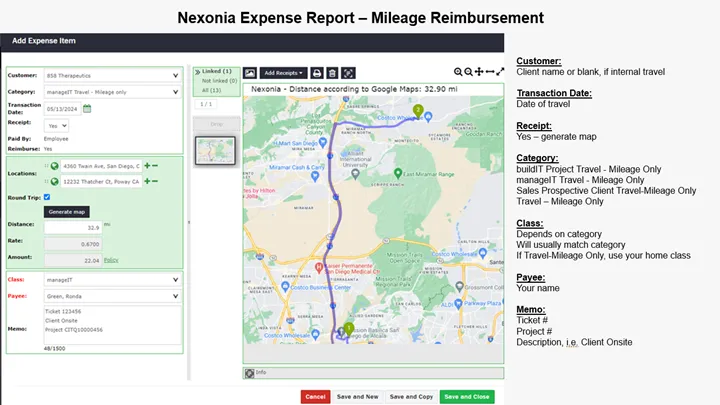
Step 6: Choose a customer (if it is an internal cIT expense, leave it blank), category, transaction date, yes for receipt, paid by employee, yes for reimburse, amount, class (generally your home group), and payee.
- If you don’t see the payee you want to use, select “Misc. Rest” for meals, or “Misc. Vendor” for anything else. If using Misc. Rest or Misc. Vendor, add the actual vendor’s name in the memo field. Step 7: Add any pertinent information to further describe the expense in the memo field. (i.e. Ticket #, Project #, or other reason for the expense)
Step 8: Click Add Receipts and use one of the three listed methods.

-
If uploading, choose a receipt from your computer. When complete, click Save and Close.
-
All receipt attachments must be legible, showing the Vendor Name, Date, and Amount
Step 9: Select the green Save and Close button. Step 10: Select the green Submit button. The approval status field should now show a blue greater than (>) symbol, instead of the yellow ellipses (…)
For Mileage Reimbursements:
Process References:
Section titled “Process References:”- Create a relationship back to related process. Note: Please add KB relationships to core process, process, SOPs or other WIs on the right.