Purpose:
Section titled “Purpose:”New images will need to be made to keep up with Windows feature and patch updates along with updated client needs
Scope:
Section titled “Scope:”Service Desk - Provisioning
Responsibility:
Section titled “Responsibility:”The provisioning technician is solely responsible for the creation and maintenance of FOG server images.
VITMs assist the provisioning tech in determining the best software to load and making sure that endpoints are set up per the provisioning work instruction.
The Request Team Lead and Service Desk Manager ensure that the provisioning tech is keeping images updated and in use.
Completion Criteria:
Section titled “Completion Criteria:”Proper endpoint provision and client acceptance
Records:
Section titled “Records:”Endpoint Provisioing records will live in the FOG Server imaging database and in puzzle for cleint-facing provisions and deployment.
Steps:
Section titled “Steps:”CIT FOG Server Host Information
Section titled “CIT FOG Server Host Information”cit-poway - 10.40.51.10 iLo - 10.40.51.135 - ProLiant DL20 Gen10 Plus – Server located in Poway Office
OS: VMware ESXi 7.0
Function: Provisioining Server
Provisioning Host cit-fog: 10.40.51.136
Virtual machine: http://10.40.51.200/fog/management
OS: Linux Ubuntu
Function: FOG virtual machine host
FOG Project Provisioning Server & VLAN 451 DHCP Server: /etc/dhcp/dhcpd.conf
cit-provisioning - 10.40.51.12
Connect to host in ScreenConnect and open VMware - https://10.40.51.10/
OS: Windows 2019
Function: Provisioning Imaging Server
Downloading the Windows Image
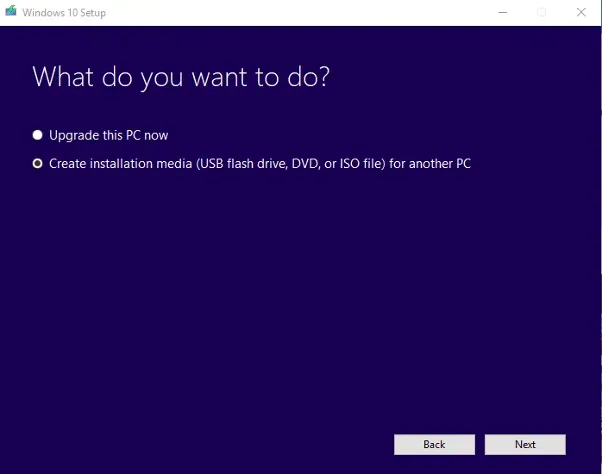
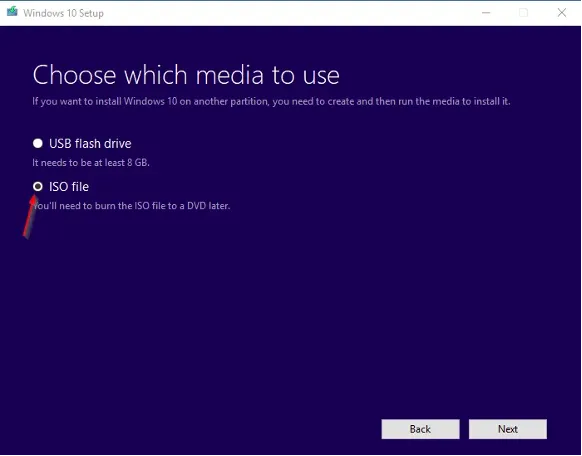
Section titled “Downloading the Windows Image”First things first: Download Windows 10 with the Windows 10 Download Tool. Make sure you create an ISO File.
After downloading I uploaded it into a folder on datastore1 in VMware
Before you start
Section titled “Before you start”• Make sure that the VM you are going to install Windows 10 on, or the physical computer, has NO INTERNET CONNECTION UNTIL WE ARE IN AUDIT MODE! This is extremely important because Windows might activate itself in the installation process, given an active Internet Connection.• Don’t enter a product key• Once we are booted into Audit Mode, we will re-enable the Internet Connection to Download the Windows ADK and software we want to install.Part 1: Installing Windows 10 in VMware
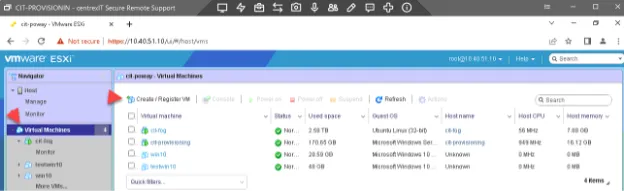
Section titled “Part 1: Installing Windows 10 in VMware”Open VMware and click on Virtual Machines then Create to create a new Virtual Machine.

Select Next

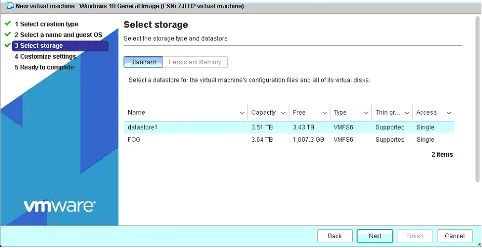
Give it a descriptive Name and select Windows 10 64-bit. Then select Next For storage use datastore1 and select Next
Now under customize add cpu and memory
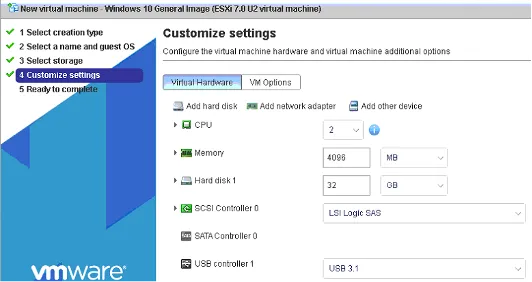
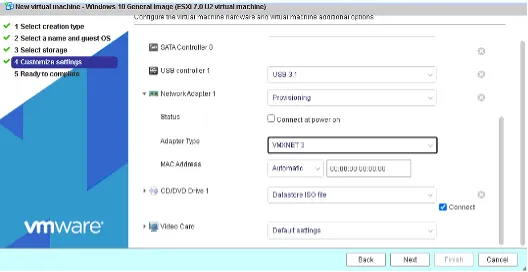
• Uncheck connect at power on for NIC, and set adapter type to VMXNET3, and under CD/DVD select the windows 10 iso you uploaded earlier, and check connect.• Keep the File Size at the Recommended 32,00GB. This highly depends on what you plan to install on the image, so if you want to install lots of software, adjust the size accordingly.• Finally select Finish then open the console and power on the VM. Push any key to boot from the DVD.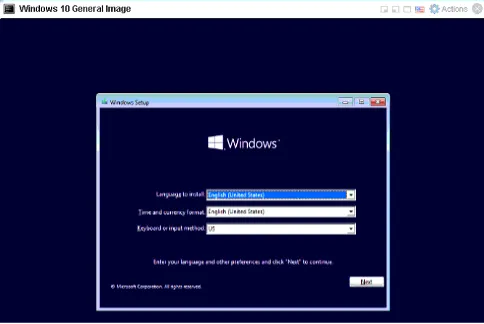
Select Next, then Install.
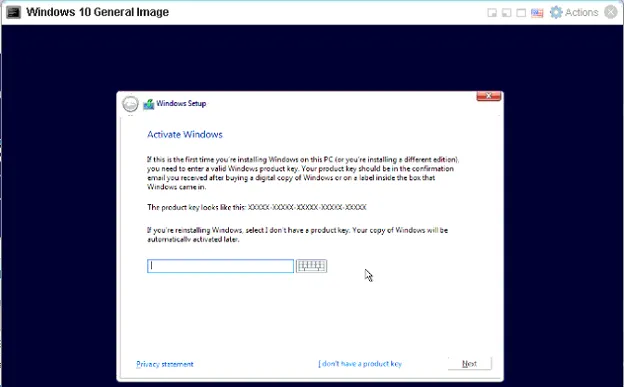
When you are getting asked for a key, click on I don’t have one.
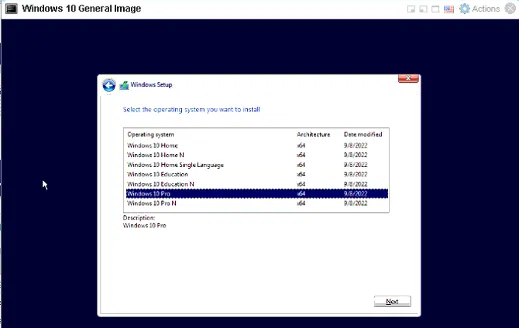
On the next screen select Windows 10 Pro then Next.
Accept the Terms and select Next.
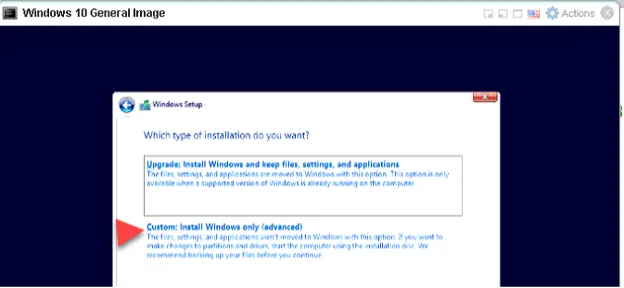
Select custom
Now select your hard drive and new

Now let the installation run through until you come to the first dialog after the reboots are done
Do not press anything
Part 2: Entering Audit Mode
Section titled “Part 2: Entering Audit Mode”After the reboots are done, this should be the first screen you will see: (as of August 2019)
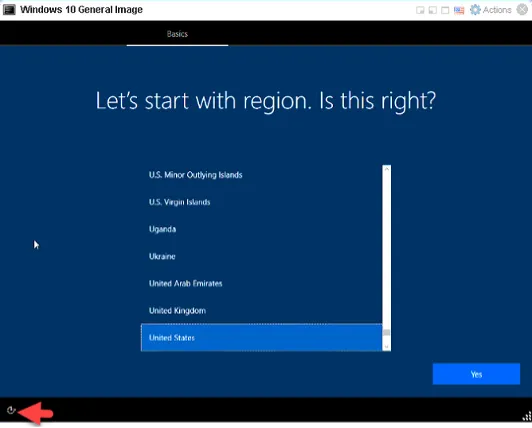
• Select the icon in the lower left corner and select ON-Screen-Keyboard• Now press CTRL + SHIFT and then hit the F3 key. Windows will now reboot into Audit Mode.• Click on Cancel on the first Dialog. That’s the Sysprep Dialog that pops up automatically, but we’ll do that later manually.Part 3: Re-Enabling the Internet Connection
Section titled “Part 3: Re-Enabling the Internet Connection”• Now we can safely re-enable our Internet Connection to Download the ADK.• You can shut down your Windows 10 now, it will automatically boot up in Audit Mode again. We need to shut it down to re-enable the network connection.• After it’s shut down, select your VM and right click go to edit settings on select network and uncheck iso.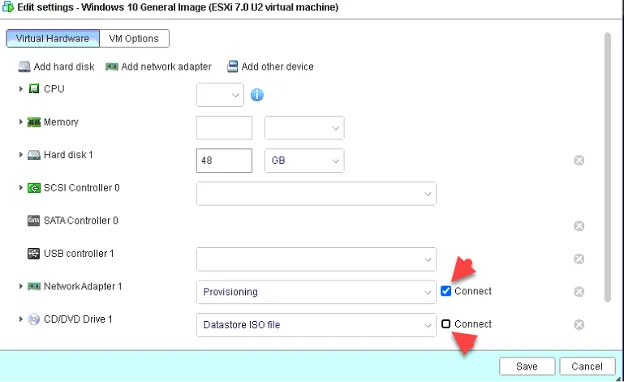
Start your VM again. After it’s booted up, cancel the Sysprep Dialog again.
Part 4: Install VMware tools
Section titled “Part 4: Install VMware tools”Right click the VM and go to guest OS and select install VMware Tools.
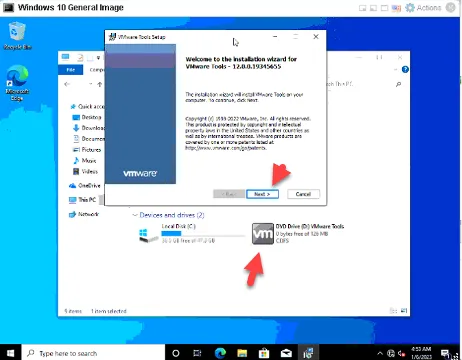
• Open my computer and right click the cd drive and run the installer.• Click next-next-install.• After that, open your CD Drive and run the Installation.• Simply follow through with the installation and agree to install everything you’re asked to.• Reboot your computer.• Cancel the Sysprep Dialog once more.Part 5: Installing the Windows ADK
Section titled “Part 5: Installing the Windows ADK”Now open INTERNET EXPLORER, not Edge. Edge will not work here.
Go to this link, Download the Windows ADK: https://msdn.microsoft.com/en-gb/windows/hardware/dn913721.aspx
You should download Windows ADK for Windows 10 Version 22H2, or whatever the newest version will be.
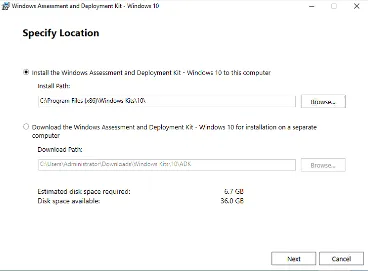
Only select deployment tools and click install
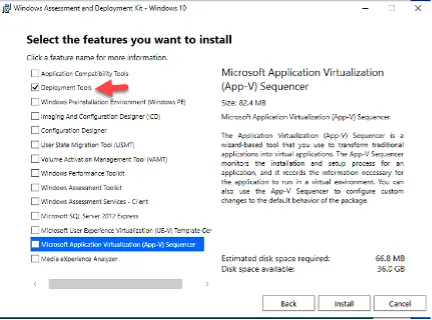
Click through the routine leaving everything on default (Except maybe if you don’t want to send anonymous data to Microsoft, untick that), until you come to the part where you can choose what to install.
Uncheck everything except Deployment tools:
Finally, click on Install.
Once this is complete, we can start customizing Windows.
Optionally, you can take a Snapshot of the machine state now (Recommended!) to revert to a fresh installation state later if you need to.
Part 6: Customizing Windows
Section titled “Part 6: Customizing Windows”First I will tell you what you can customize:
- Desktop Icon Spacing and Sizes.- File Explorer Settings- Screensaver- Windows Wallpaper- Windows Icons, Sounds, Themes, and Colors •All those settings, when modified in Audit mode, will be saved in the Default User Profile.
Meaning, that every user that you will add to this machine later (Even Domain Users), will have those settings applied to them.
Now you can also go ahead and Install every Software you want to have available on your General Image. For Example:
- Office- VLC Player- Antivirus- etc- Run Chkdsk /f /p prior to imaging- Defrag the drive- Make sure 2gb of disk space is free or the NTFSresize will fail- Make sure the FOG service is installed and properly configured- Update your hostnamechange.dll file- Enable Admin account- Set admin PW- Disable UAC- Disable Sidebar objects?- My Computer, IE, Recycle Bin, Documents on Desktop- Change Home page- Delete Start Menu Items- Run Media Player- Disable System Restore- Disable Hybernation- delete Hyberfile.sys- disable Virtual Memory- delete pagefile.sys- Firewall: Allow Fog Client Exceptions- Disable Windows Defender- Disable automatic updates- Security Center - Warnings- Disable Windows Welcome Screen- Don't show this message - IT Information Bar- Power Options- HAL Drivers set correctly within Device Manager (Advanced Configuration and Power Interface (ACPI)- Show "Run" and "Printers" in Start menu- Windows Updates up-to-date- Enable Remote Desktop- Enable Remote Assistance- Show Hidden Files Disable Hidden Files- Remove/Delete other Windows Accounts- Delete Recent Items- Empty Recycle Bin- Copy Creation Profile to Default profile- Defrag- Disk Clean up- Chkdsk OS partitionNow we are going to also install the FOG-Client.- powercfg.exe /hibernate offNavigate to HTTP://10.40.51.200/fog/client or simply open an instance of your FOG-Server in the web browser and find “Fog Client” on the bottom of the page.
Download the Smart Installer.
Enter the IP address of your FOG Server and leave Web Root as default, except you changed the default Web Root, of cours. Then deselect “FOG Tray” to hide the FOG symbol from the taskbar, so the user can’t see it.
After you got everything installed, I would recommend you change the computer name to something less generic, EXAMPLE: CLIENTINITIAl-SerialNumber
Just hit the Windows Key and type: Name
Select Show Computer Name and change it to something descriptive.
Reboot your system. Cancel the Sysprep Dialogue one more time.
Part 7: Creating an Answer File
Section titled “Part 7: Creating an Answer File”Now we need to create our Answer file that tells Sysprep what kind of changes we want to have applied to our Image.
First, we need to put back our Windows 10 Image into our VM, so Sysprep can access the installation medium.
Right Click VM- Edit Settings – Connect Datastore ISO and Select your Windows 10 Image again.
Open an Explorer Window and open the Windows 10 Image. Select all files and copy them.
Create a new folder in C:\customize\Win10 and paste the files in there.
Converting install.esd to install.wim
Section titled “Converting install.esd to install.wim”Now we need to convert the install.esd file to a install.wim file so we can use it for creating our answer file.
Press your Windows Key once more and type “Powershell”.
Right-click Powershell and select Run as Administrator.
Run the following command next: *dism /Get-WimInfo /WimFile:C:\customize\Win10\sources\install.esd
Now depending on which Windows 10 Version you want to install, you need to choose the correct index number in the next step.
Note in our case, it’s “6” for Windows 10 Professional.
Next we are going to create our install.wim by running: *dism /Export-Image /SourceImageFile:C:\customize\Win10\sources\install.esd /SourceIndex:6 /DestinationImageFile:C:\customize\Win10\sources\install.wim /Compress:Max /CheckIntegrity
Make sure to adjust the command with your own SourceIndex Number! And make sure the path is the same for Source and Destination.
Creating the Answer File using Windows System Image Manager
Section titled “Creating the Answer File using Windows System Image Manager”Open Windows System Image Manager by pressing the Windows Key and typing it’s name.
Click on File -> Select Windows Image
choose the C:\customize\Win10\sources\install.wim file we just created.
Select YES in the following dialogue. If you get an error message, follow the updated instructions below.
This should solve all problems.
Creating a Distribution folder
Section titled “Creating a Distribution folder”Create a Folder called Distribution in C:\customize\ and within this Folder create 4 Subfolders:
- $OEM$- LangPacks- Out-of-Box Drivers- PackagesNext back in Windows System Image Manager Click on File -> Select Distribution Share.
Select the Distribution folder we just created and click on Ok.
Next click on File -> New Answer File.
If you just want to create an answer file and manually run through the Windows installation each time you pull your FOG Image to a new client, you can just go ahead and continue with saving the file.
Click on Tools -> Validate Answer File when you are ready.
From here on you can save your file by selecting File -> Save Answer File -> C:\customize\customize.xml
If you want to learn how to hide this Customize Folder so your users don’t see it, I got you covered!
Alright, finally we have everything set up and we are able to run Sysprep!
Part 8: Running Sysprep
Section titled “Part 8: Running Sysprep”Make sure you have everything set up as you want it to be.
This will generalize your image.
TAKE A SNAPSHOT NOW! You can later revert back to this snapshot in case you want to change software, update windows, modify your answer file, and so on.
After taking a Snapshot, you can go ahead and delete the C:\customize\Win10 folder to save you some disk space, or, you remove it later after installing the image on a client.
Hit the Windows Key, type in: cmd, and right-click Run As Administrator.
Navigate to the Sysprep directory by typing: *cd c:\Windows\System32\Sysprep
Stop Windows Media Networking Service to avoid errors during Sysprep by typing: *net stop wmpnetworksvc
It never was actually started for me, but it might be for you. Just do it to be safe.
DO NOT DO ANYTHING WITH THE COMPUTER WHILE SYSPREP IS RUNNING!
Now we start Sysprep. After running the command, Sysprep will prepare the Image: *sysprep.exe /generalize /oobe /shutdown /unattend:C:\customize\customize.xml
After Sysprep is finished, shut down your computer if it doesn’t do it by itself.
Congratulations, now you have your Generalized Windows 10 Image.
Anytime you want to do changes on this image, like update Windows, Install new Software, change Software, or whatever, just go back to that one Snapshot you took before running Sysprep, make changes, and run Sysprep again.
Part 9: Capturing our Image with FOG Server
Section titled “Part 9: Capturing our Image with FOG Server”Alright, finally time to get our FOG Server back into play!
Make sure your FOG Server is running, if you set everything up correctly, we should be done in no time now!
First, log in to your FOG Web Interface and head to Images.
Click on Create Image and adjust everything like in my screenshot.
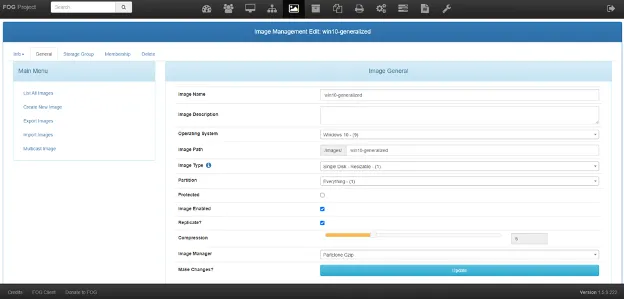
It might sound a bit counter-intuitive, but you have to first create an Image in the Database of FOG to be able to capture it.
Alright, time to register our Windows 10 host in FOG:
Select your Windows 10 VM and click on System. Make sure you have Network Boot Enabled in your VM and it’s on position #1.
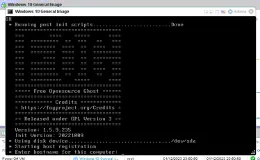
Fire up the client and you should end up in your PXE Boot Environment.
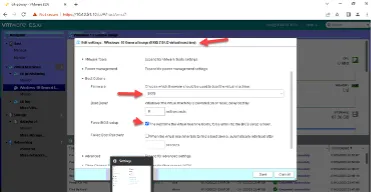
In bios set NIC to boot first
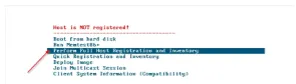
Choose Perform Full Host Registration and Inventory.
Questions and Answers during the process:
- Enter the hostname for this computer:Enter your hostname, for example, Win10General - Enter the image ID to associate with the computer Confirm with Enter - Would you like to associate this host with groups? NO - Would you like to associate this host with snapins? NO - Would you like to… a product key to this host? NO - Would… Join a domain? NO - Enter the primary user for this computer: Creat localuser, confirm with Enter - Enter other tag #1 Enter - Enter other tag #2 Enter - Would you like to deploy the image to this computer now? NO
Now your Win10 General Image is registered in your FOG-Server.
Power off your VM after the registration process is finished and the machine attempts to reboot.
Part 10: Capturing our Image
Section titled “Part 10: Capturing our Image”Bear with me guys, just a few more steps and we are golden.
Back to your FOG-Server Web Interface.
Head to Hosts -> List All Hosts and click on your Win10General Host.
In case your host is not listed under its hostname, you can simply network boot your Win10General VM once again and look up its MAC Address, then rename it in FOG:
After you select your host, choose your Windows 10 General Image that you created earlier.
Don’t mind the different names on the screenshots, just select what you created.
Click on Update.
When that’s done, Navigate to Task Management -> List All Hosts and click on Capture next to your Win10General Host.
Head back to the Settings tab in your VM. You should now have Network on first and Hard Disk on the second position: on hard disk select sda(0,0) first
Now start your VM. The Image Capturing process starts automatically.
After the capturing process is finished, just switch off your Win10General Host until you need to have some changes done on it again. It can rest for now.
Head over to Images and click on All Images in your FOG-Server Web Interface.
If all went well, you should now see that your Win10General Image grew to a certain size.
This means that the capture task was completed successfully.
Part 11: Deploying the Image
Section titled “Part 11: Deploying the Image”You probably have guessed it by now.
The Deploying process is very simple now.
I won’t step-by-step screenshot it for you because if you have followed through with everything before, it should be a breeze for you.
- Boot a new client via PXE Boot.
- Perform a Full Host Registration.
- Choose a Hostname
- You can now already decide if you want to associate an Image ID with this computer. Press ? to list all Image IDs and choose the one you would like to deploy. You can also NOT do this and associate an Image with the host registration via FOG-Web Interface. You select the Host, associate the Win10General Image to it and head to Task Management, and choose Deploy Image. That’s way more steps, so I always opt for Associate Image ID with this computer already here.
- On the last question of the registration process: Would you like to deploy the Image to this Computer now? You choose Yes.
FOG will now deploy the Image to your computer fully automatically
Process References:
Section titled “Process References:”- Create a relationship back to related process. Note: Please add KB relationships to core process, process, SOPs or other WIs on the right.