Purpose: This WI goes through migrating the Exchange Hybrid Configuration to another VM, then decommissioning the existing Exchange server(s) to complete the migration to M365. Per Microsoft, it is recommended to keep a small VM with the Hybrid connection if the client intends to keep Azure AD Connect.
Section titled “Purpose: This WI goes through migrating the Exchange Hybrid Configuration to another VM, then decommissioning the existing Exchange server(s) to complete the migration to M365. Per Microsoft, it is recommended to keep a small VM with the Hybrid connection if the client intends to keep Azure AD Connect.”Identify the VM to install the Exchange Hybrid Configuration
Section titled “Identify the VM to install the Exchange Hybrid Configuration”If we are moving the Exchange Hybrid Configuration to our private cloud, you have two options for installing the Exchange Hybrid Configuration:
- Collocate Exchange Hybrid Configuration on an existing utility VM that is not currently a Domain Controller, or utilizing IIS.
- If no VM is available to collocate, then spin up a small footprint VM with 2 VCPU, 4GB of RAM, and 100GB OS disk.
Prepare VM
Section titled “Prepare VM”If you are spinning up a new VM, be sure to complete the following tasks:
- Run sysprep and generalize the server.
- Set the hostname appropriately.
- Set static LAN IP.
- Join to domain.
- Install N-central agent.
- Install antivirus.
- Install ScreenConnect.
- Add VM to backups.
Install Exchange Prerequisites
Section titled “Install Exchange Prerequisites”If installing Exchange 2019 (current as of this writing), please verify the following prerequisites are met:
- Domain controllers must be Windows Server 2012R2 or higher.
- Domain functional level must be Windows Serer 2012R2 or higher.
If pre-requisites are met, proceed with downloading Exchange ISO from our Microsoft VLSC page.
https://www.microsoft.com/Licensing/servicecenter/default.aspx
Install .NET Framework 4.8.
Install Visual C++.
https://www.microsoft.com/download/details.aspx?id=30679
Install Remote Tools Administration Pack by running the following command in Windows PowerShell:
Install-WindowsFeature RSAT-ADDS
Install Windows Components.
Install Server Media Foundation.
Install all Windows Updates.
Install Exchange Server 2019
Section titled “Install Exchange Server 2019”Mount the ISO and run setup.exe.
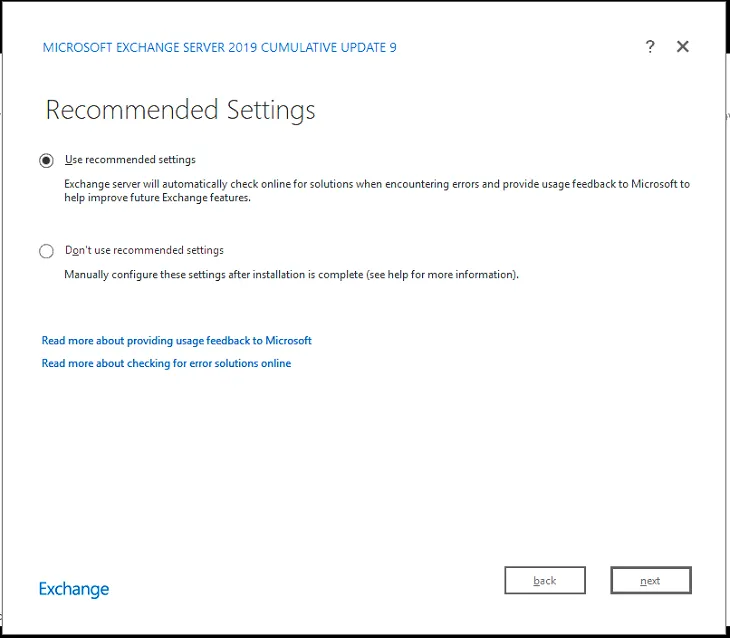
Select Use Recommended Settings and click Next.
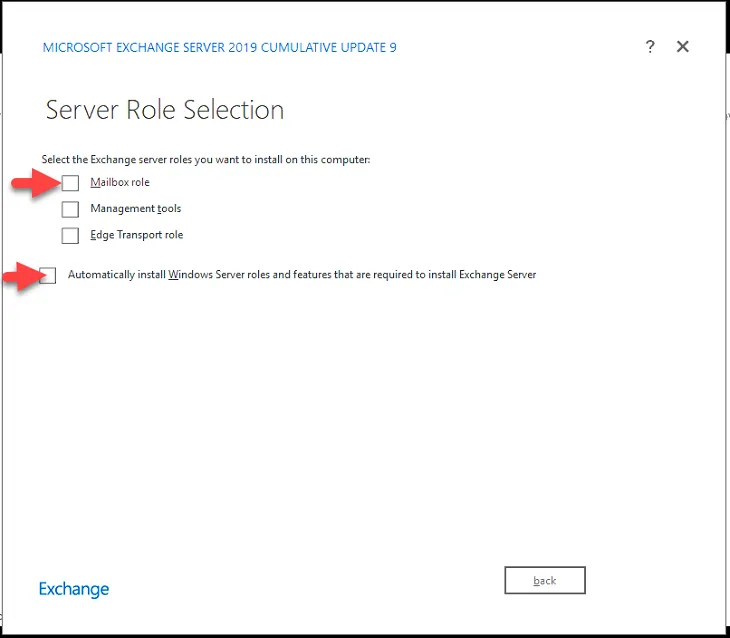
Since there is no Hybrid-only role, we must select the Mailbox role at a minimum. Select Mailbox Role, and select Automatically install Windows Server roles and features that are required to install Exchange Server, and click Next.
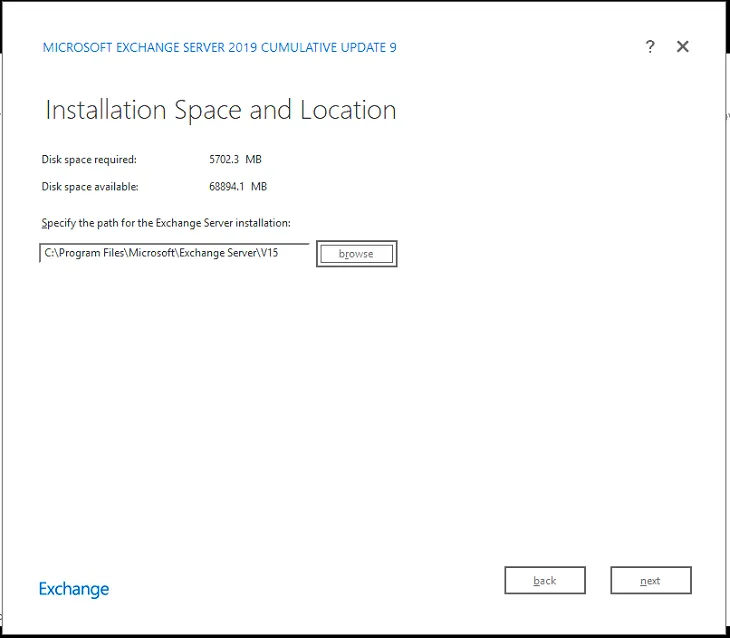
Specify the desired installation location. In this instance, we will leave it as the default location. Click Next.
Leave the default selected and click Next.
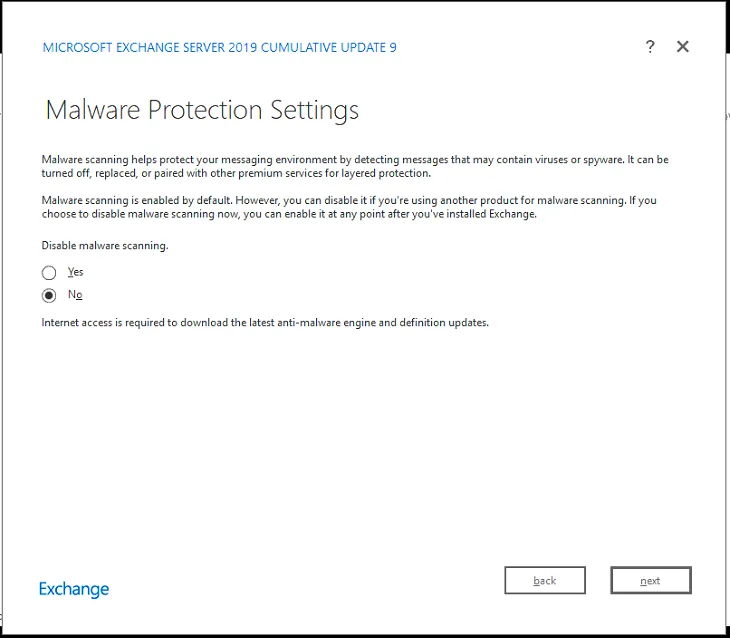
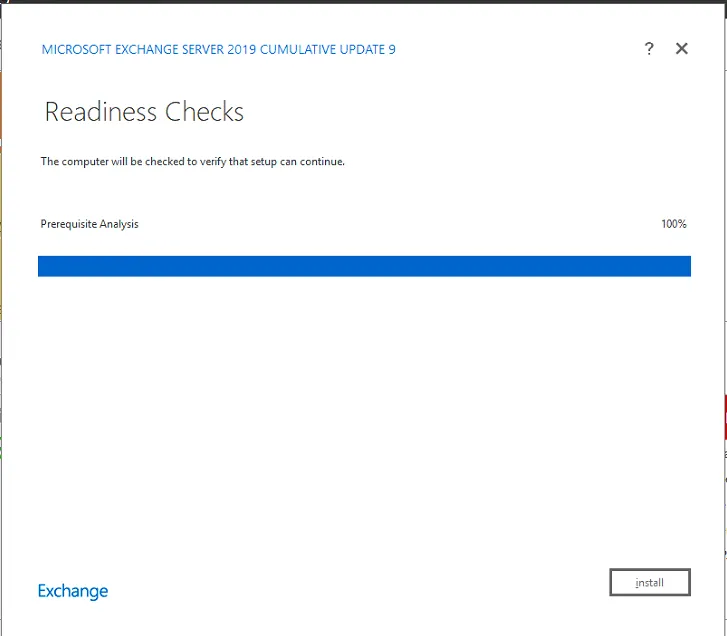
The installer will perform a readiness check.
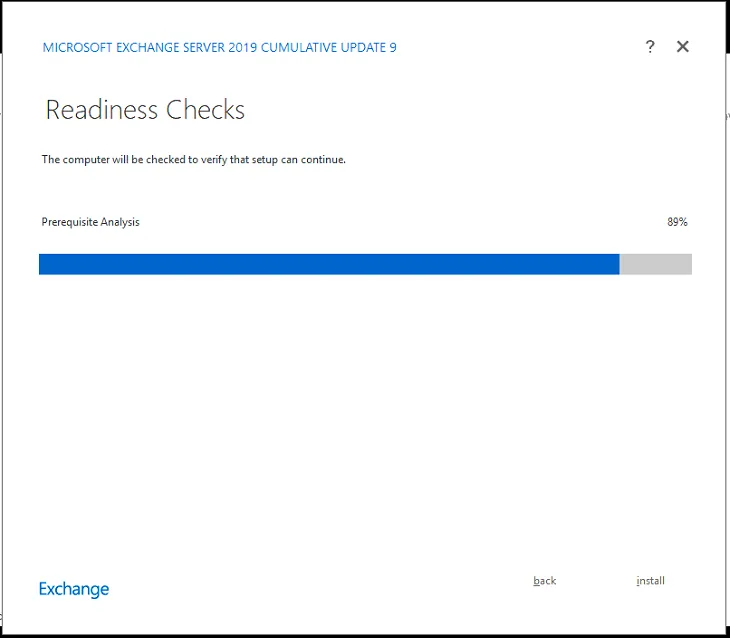
If the Readiness Check identifies issues, please address the issues and then click Retry. If there are no issues, click Install.
The install will begin.
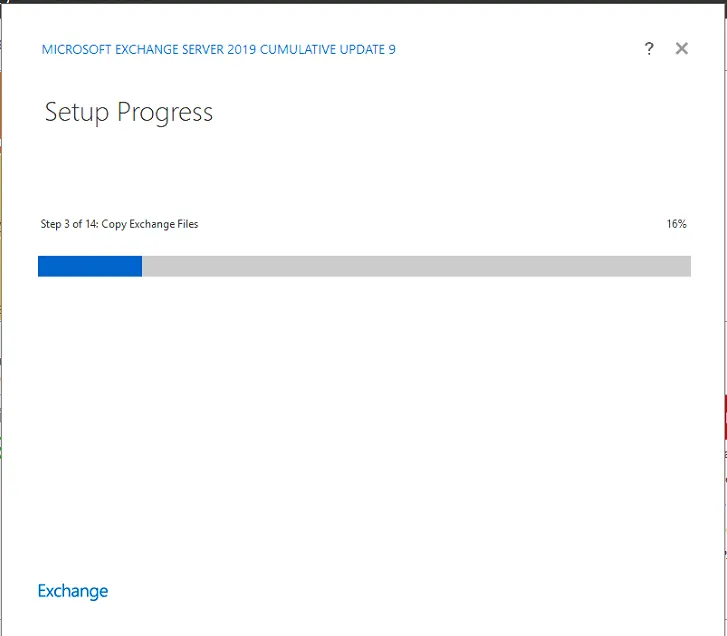
Once the install is complete, click Finish.
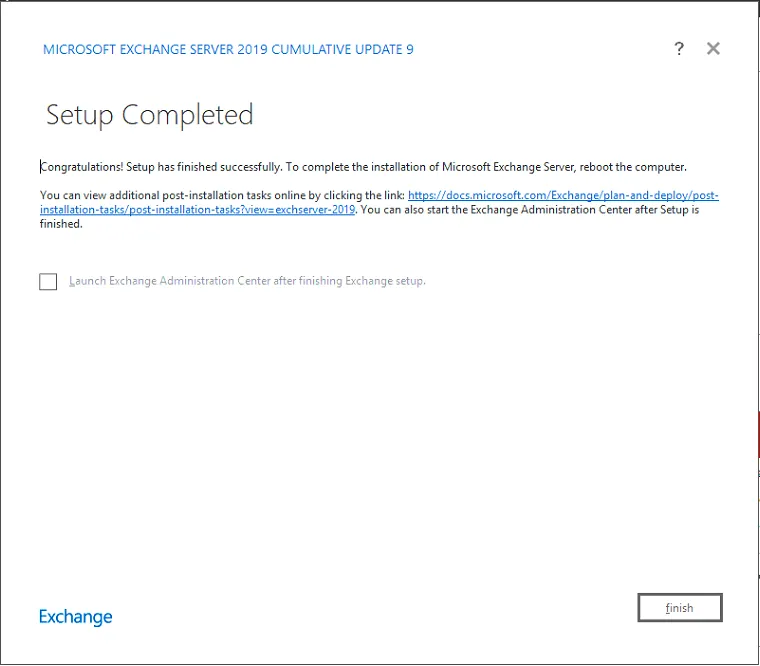
Reboot the server. Exchange is now installed.
Verify all migration batches are deleted.
Section titled “Verify all migration batches are deleted.”By now, you should have completed the migration of the mailboxes. You must delete the all the migration batches listed within the M365 Exchange admin center.
Update the SCP to the new Exchange Server
Section titled “Update the SCP to the new Exchange Server”To view the SCP on the old server, type the following command. Be sure to change OldServerName to match the server hostname of the old exchange server.
Get-ClientAccessServer -Identity OldServerName | fl
Look for the “AutoDiscoverServiceInternalURI” property here. For example, this might look like:
https://autodiscover.company.com/Autodiscover/Autodiscover.xml
It may also show up as webmail.company.com/Autodiscover. Whatever you see as the output here, this is the value you need to apply on the new server. To do this, you can type the following command. Be sure to update the NewServerName and the correct autodiscover URL below.
Set-ClientAccessServer -Identity NewServerName -AutoDiscoverServiceInternalURI https://autodiscover.company.com/Autodiscover/Autodiscover.xml
Import the Exchange UCC Certificate
Section titled “Import the Exchange UCC Certificate”Export the UCC Certificate from the old server, and import it into the new server.
To Export:
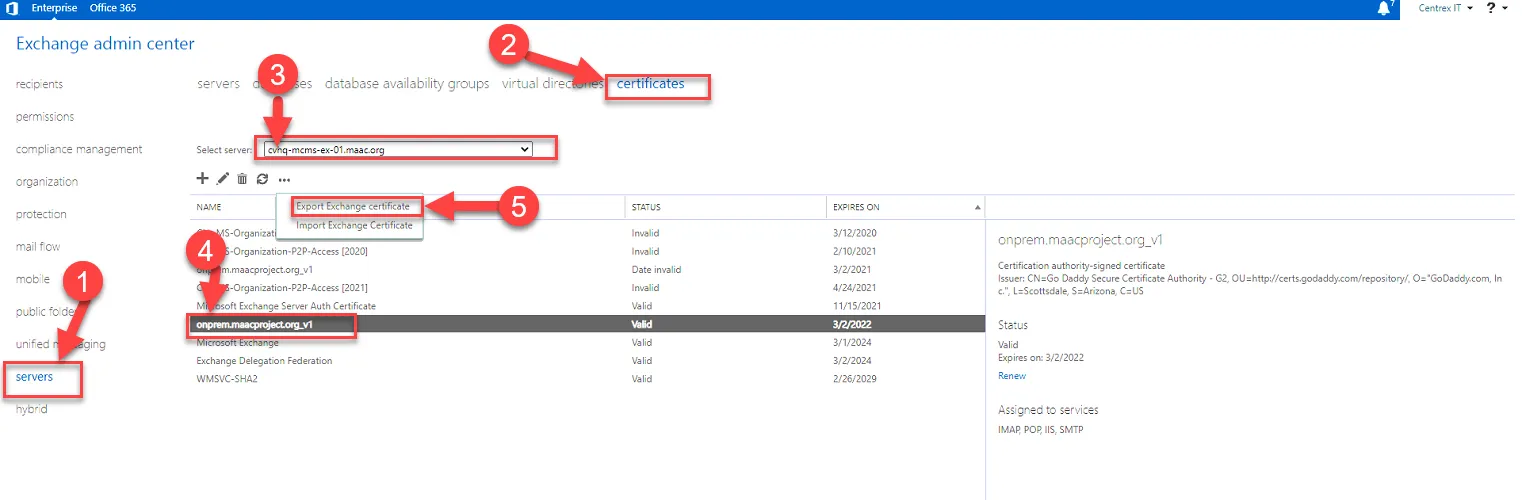
To Import:
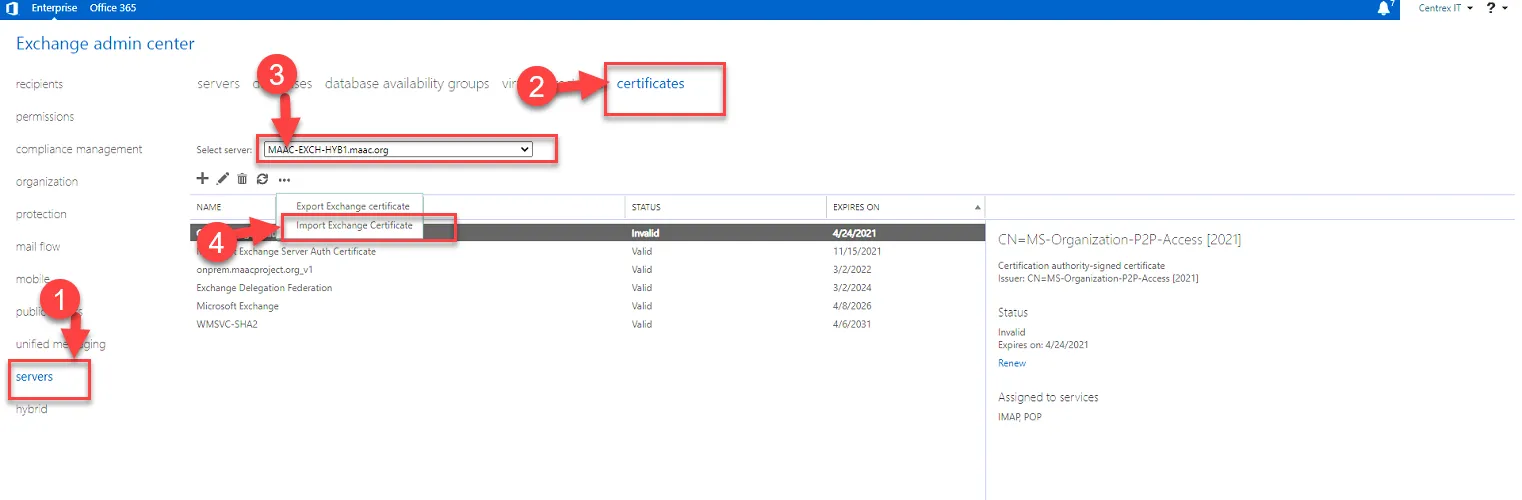
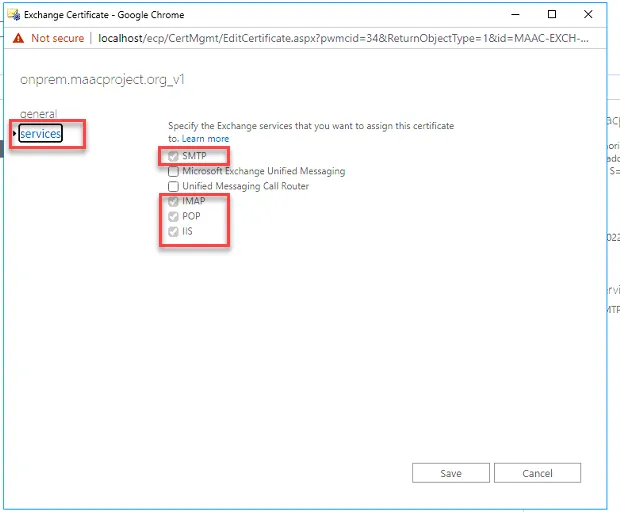
Once the cert is imported, associate the following services to it: IMAP, POP, IIS, and SMTP.
Click on the cert, and click Edit.
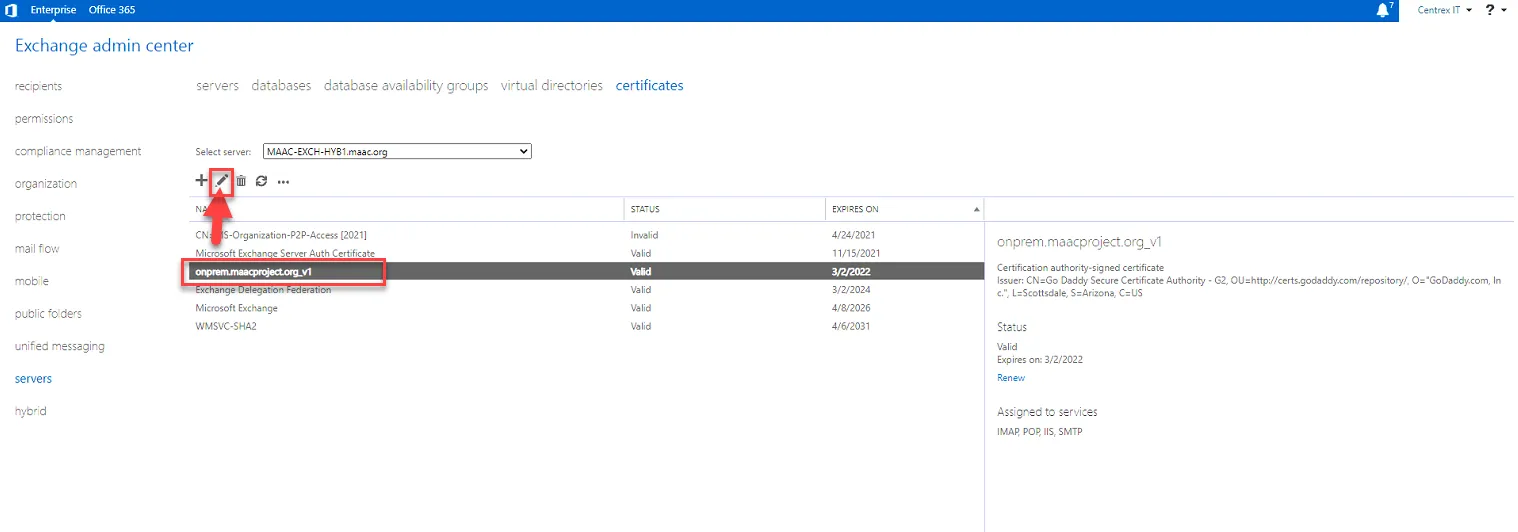
Click Services and then check the box for SMTP, IMAP, POP, and IIS. Click Save.
Update Exchange Virtual Directories & Outlook Anywhere Settings
Section titled “Update Exchange Virtual Directories & Outlook Anywhere Settings”Edit the values of $ServerName and $FQDN variables below to match what is appropriate in your environment. Run this script on Exchange PowerShell.
$ServerName = “EXCH16” $FQDN = “mail.company.com”
Get-OWAVirtualDirectory -Server $ServerName | Set-OWAVirtualDirectory -InternalURL https://$($FQDN)/owa -ExternalURL “https://$($FQDN)/owa”
Get-ECPVirtualDirectory -Server $ServerName | Set-ECPVirtualDirectory -InternalURL “https://$($FQDN)/ecp” -ExternalURL “https://$($FQDN)/ecp”
Get-OABVirtualDirectory -Server $ServerName | Set-OABVirtualDirectory -InternalURL “https://$($FQDN)/oab” -ExternalURL “https://$($FQDN)/oab”
Get-ActiveSyncVirtualDirectory -Server $ServerName | Set-ActiveSyncVirtualDirectory -InternalURL https://$($FQDN)/Microsoft-Server-ActiveSync -ExternalURL “https://$($FQDN)/Microsoft-Server-ActiveSync”
Get-WebServicesVirtualDirectory -Server $ServerName | Set-WebServicesVirtualDirectory -InternalURL “https://$($FQDN)/EWS/Exchange.asmx” -ExternalURL https://$($FQDN)/EWS/Exchange.asmx -BasicAuthentication $true
Get-MapiVirtualDirectory -Server $ServerName | Set-MapiVirtualDirectory -InternalURL “https://$($FQDN)/mapi” -ExternalURL “https://$($FQDN)/mapi”
Get-OutlookAnywhere -Server $ServerName | Set-OutlookAnywhere -ExternalHostname $FQDN -InternalHostname $FQDN -ExternalClientsRequireSsl $true -InternalClientsRequireSsl $true -DefaultAuthenticationMethod NTLM
Configure Static NAT and allow 443
Section titled “Configure Static NAT and allow 443”Depending on your firewall, create a static NAT for your new Exchange Server, and allow 443 from anywhere.
Update A-Records (Internal and External)
Section titled “Update A-Records (Internal and External)”Update the corresponding URL’s A-records to your new Exchange server’s IPs for the Internal and External DNS Zones.
Install O365 Hybrid Configuration on the New Exchange Server
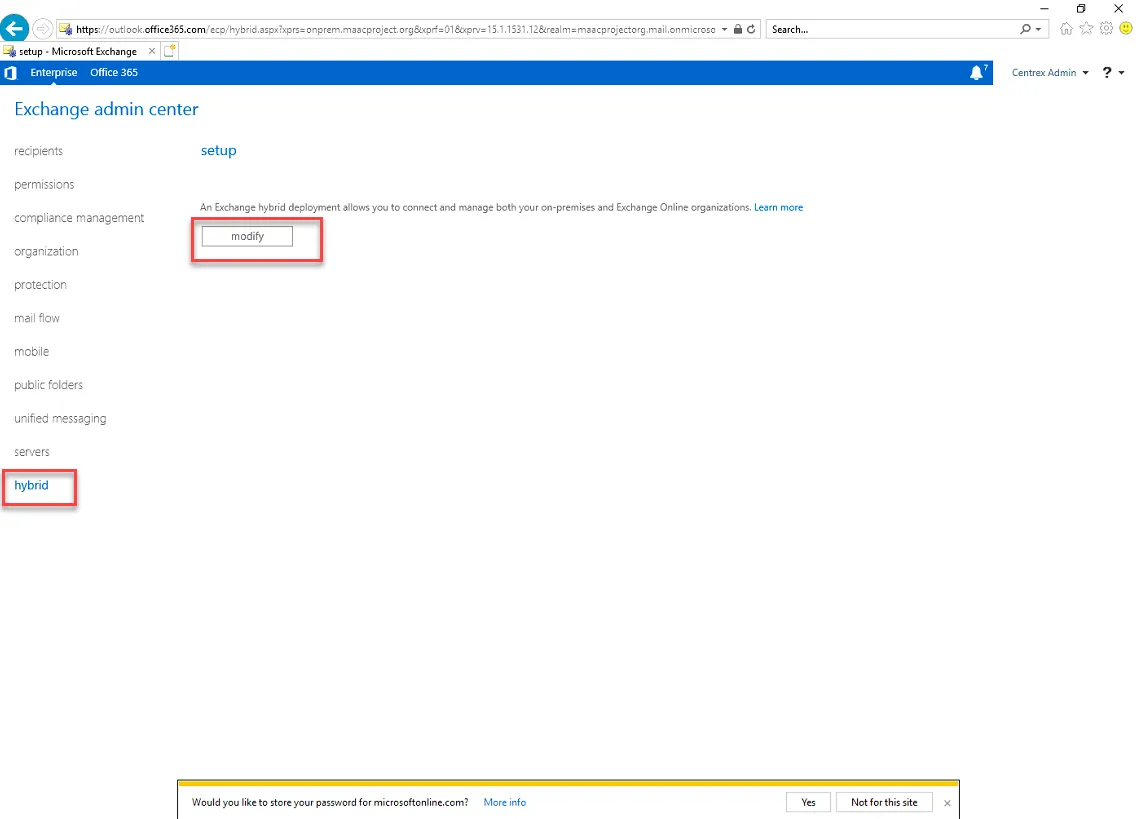
Section titled “Install O365 Hybrid Configuration on the New Exchange Server”Log into your new Exchange server, and log into the Exchange Admin Center. Click on Hybrid, then click Modify.
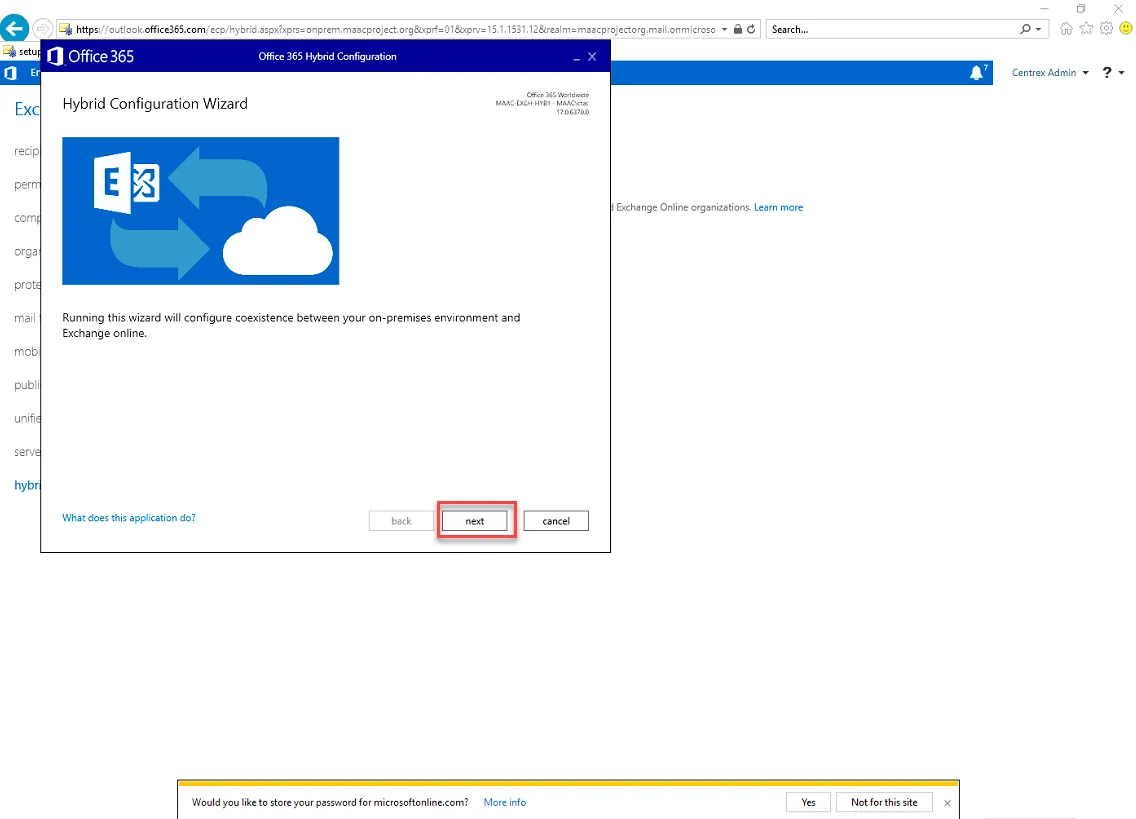
The Hybrid Configuration Wizard will appear. Click Next.
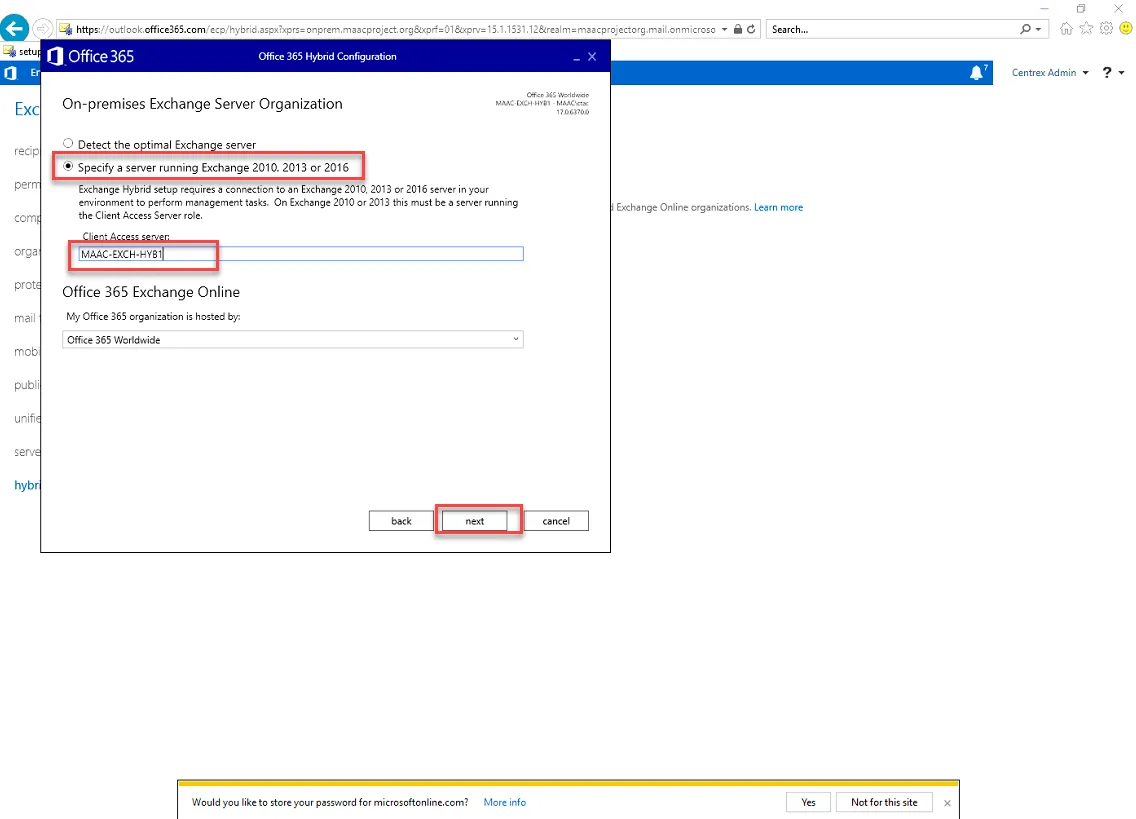
Select “Specify a server running Exchange…” and select your new Exchange server. Then click Next.
Click Sign in.

Type in the Global Administrator credentials for M365.
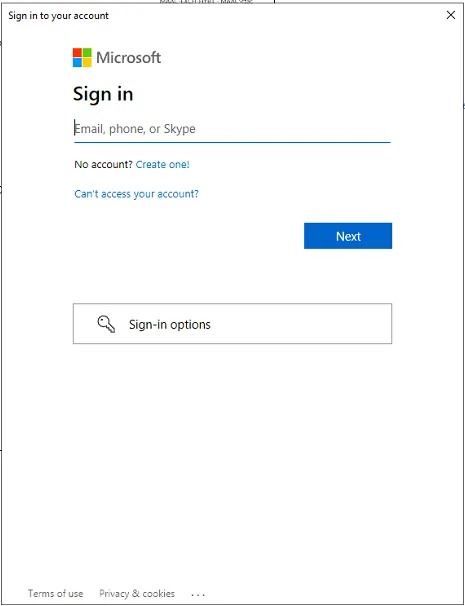
After entering the credentials, click Next.

Hybrid Configuration Wizard will collect some data. Once it says “Succeeded,” click Next.

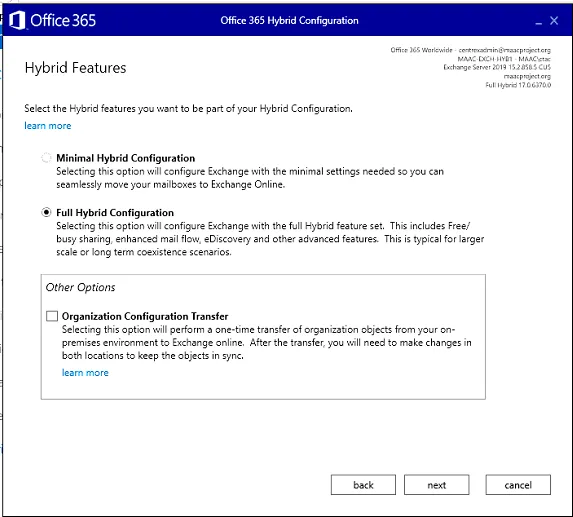
Select Full Hybrid Configuration, and click Next.
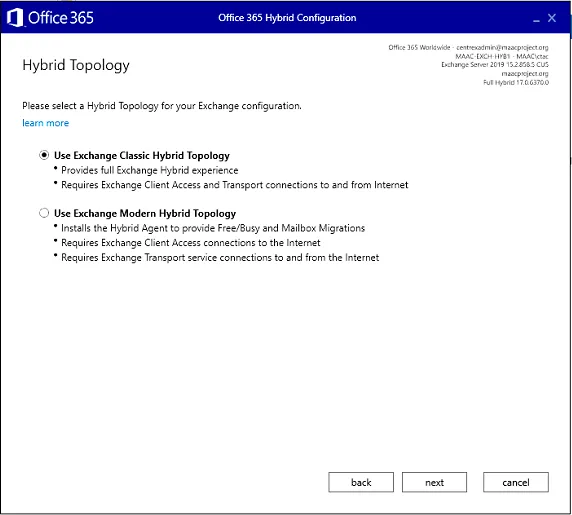
Select the Hybrid Topology that was first used. In this scenario, we used Exchange Classic Hybrid during our initial migration.
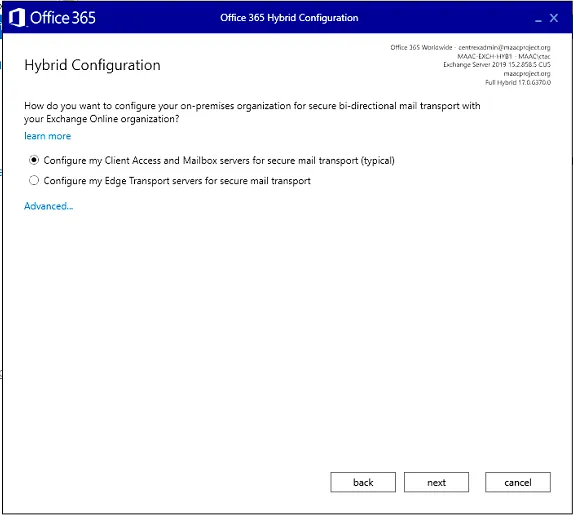
Select “Configure my Client Access and mailbox servers for secure mail transport (typical).
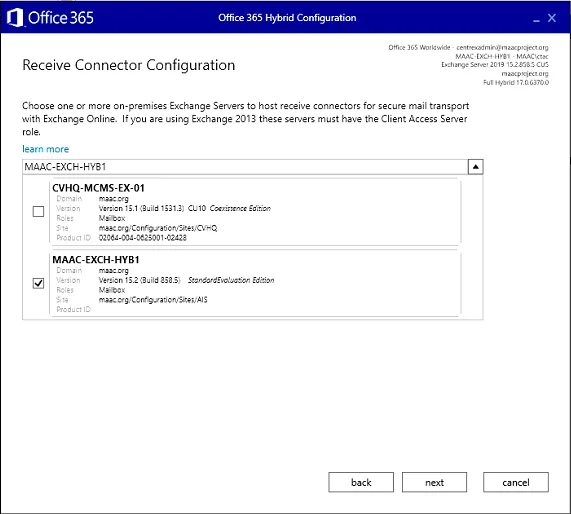
Select your new Exchange server.
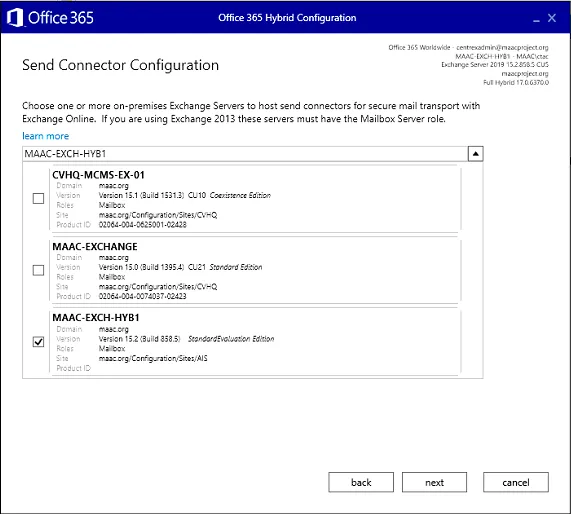
Select your new Exchange server one more time.
Select the correct certificate.

Click Update.
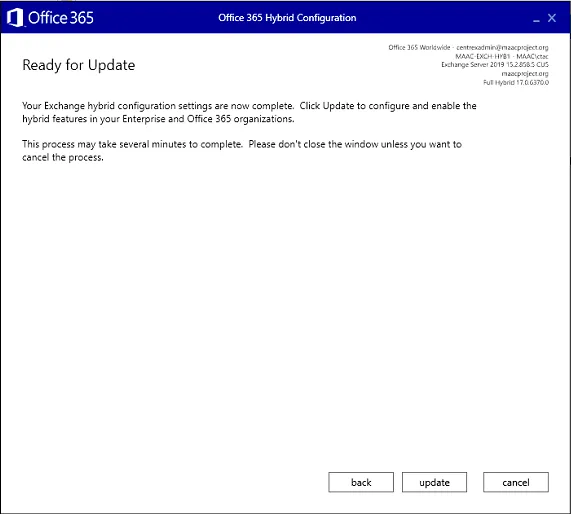
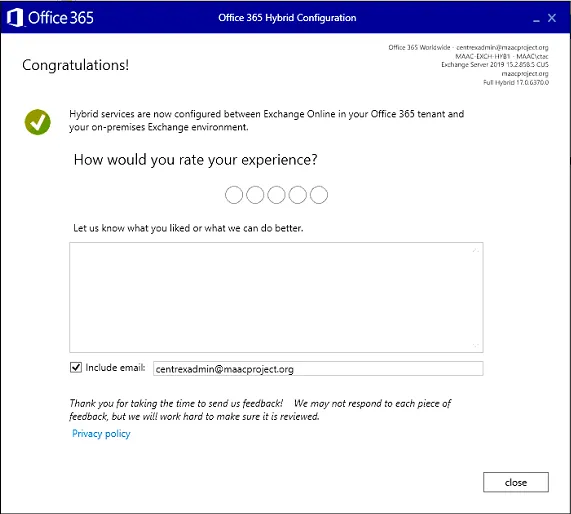
The Exchange Hybrid Wizard will run its updates. If successful, you should get the following page.
Exchange decommission steps for review:
- run the “remove-hybrid configuration command” from the exchange server you are decomissioning.
- remove the connectors
PENDING REVIEW - JM - Uninstall the old Exchange Servers
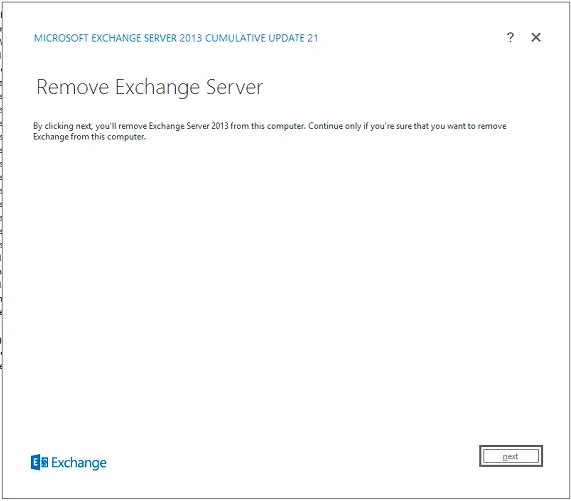
Section titled “PENDING REVIEW - JM - Uninstall the old Exchange Servers”Uninstalling Exchange 2013
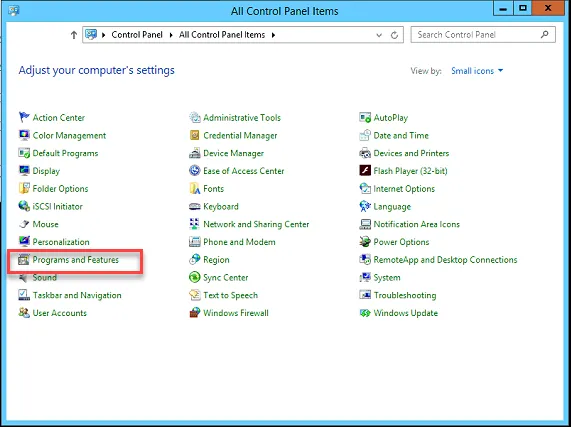
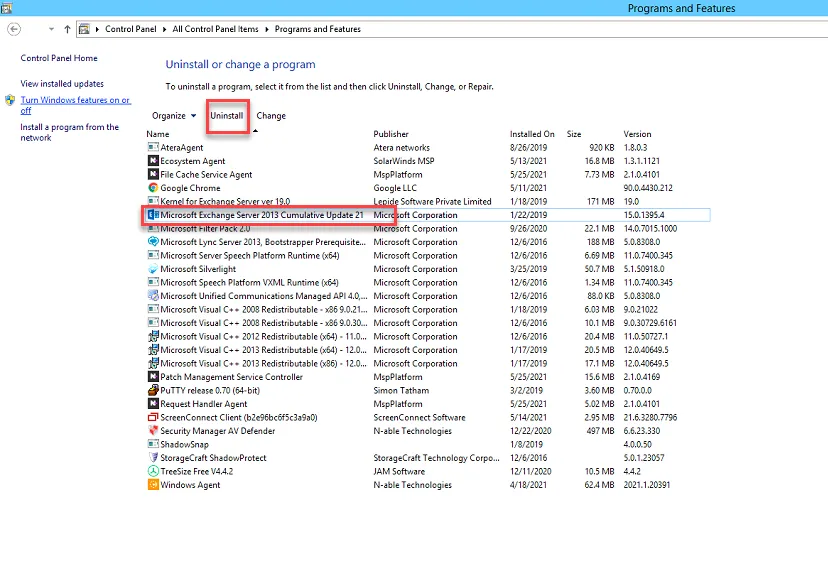
Launch control panel, and click Programs and Features.
Select Exchange Server 2013 and click Uninstall
The uninstall wizard will display. Click Next.