| Rev| Section|Location|Date|Contributor|
|—|—|—|—|—|—|
|2.0| Responsibility, Records, Steps |Created new workflow for creating tickets & stakeholder communications. All comms going through Touchbase ticket & childing Provisioning and New User tickets to parent Touchbase ticket |10/25/23|Cory Walton|
|1.0| All |Reworked entire document please review and follow carefully|10/19/23|Cory Walton|
Purpose:
Section titled “Purpose:”Please use this work instruction to create a new Belardi Wong user when a New User Onboarding Request is received.
-
Electronic Forms Information (sign into via 1Password > Websites > M365 GA Belardi Wong). A powerautomate flow emails intake for New User Onboarding Requests.
-
Forms are located in the HR and IT M365 Group
-
HR/Manager link to Submit New Employee Requests
-
IT Admin link to Edit Edit New Employee Onboarding Form (INTERNAL IT USE ONLY!)
Scope:
Section titled “Scope:”-
Service Delivery
-
Customer Satisfaction
Responsibility:
Section titled “Responsibility:”-
Service Desk
-
IMPORTANT: Create initial New User Onboarding Request as a Parent Touchbase ticket and Child Provisioning & New User tickets.
-
IMPORTANT: To centralized comms please provide all client/stakeholder updates on the Touchbase ticket created above, the following communications should be posted publicly in the Touchbase ticket:
-
Who will be performing the Touchbase call and confirm the date/time
-
When the New User’s account is created
-
Confirmation of the device being shipped with the tracking number
-
vITM
Completion Criteria:
Section titled “Completion Criteria:”-
Appropriate POCs from the initial New User Onboarding Request receive all updates on Touchbase ticket
-
New User created in the Belardi Wong Active Directory
-
New User created in the Adstra Active Directory
-
New User in the Belardi Wong M365 Tenant licensed with Business Premium
-
Appropriate communications to client stakeholders for shipping and account creation
Records:
Section titled “Records:”-
Halo Tickets
-
Touchbase (initial intake ticket)
-
New User (childed to Touchbase)
-
Provisioning (childed to Touchbase)
-
Belardi Wong M365 Forms Responses: https://belardiostroy.sharepoint.com/:x:/r/sites/HR-IT/_layouts/15/doc2.aspx?sourcedoc=%7B84FDEC91-F0C7-4546-AF62-39EDEBA2BCD8%7D&file=New%20User%20Notification.xlsx&action=edit&mobileredirect=true&d=w84fdec91f0c74546af6239edeba2bcd8
Requirements:
Section titled “Requirements:”-
Belardi Wong and Adstra AD Domain username MUST be the same
-
1Password > Adstra > Domain\Service Accounts > Active Directory Belardi Wong
-
1Password > Adstra > Domain\Service Accounts > Active Directory Adstra
-
1Password > Adstra > Websites > M365 GA Belardi Wong
-
1Password > Adstra > Websites > New M365 GA Adstradata.com Tenant
Steps:
Section titled “Steps:”-
IMPORTANT: Please provide all public updates in the Touchbase ticket (reference Responsibility & Records section). New User tickets should be a child of the Touchbase ticket.
-
Start by checking the Adstra and Belardi Wong Domain Controllers to make sure there will not be a username conflict:
-
Adstra: “CL-DC01” or “ADSTRA-DC2”
-
Belardi Wong: “BW-NOC-DC1” or “BW-NOC-DC2”
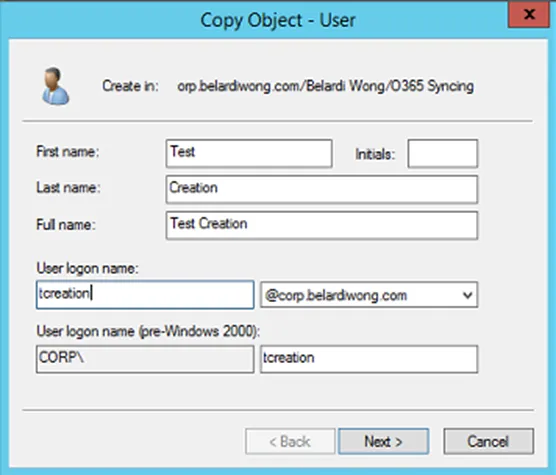
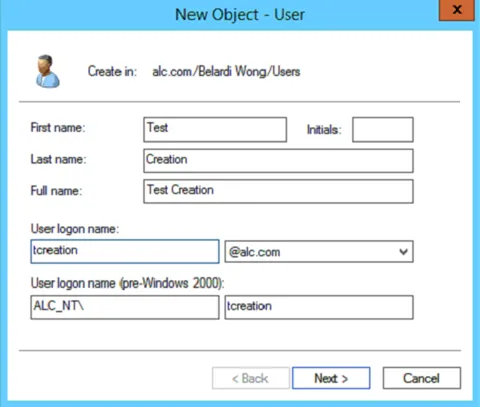
- IMPORTANT: When creating a user, it will be in the [First Initial Lowercase][Last Name Lowercase] (“flast” format). Username MUST be the same in both the Adstra and Belardi Wong Active Directory.
-
Example: jdoe
-
Conflict convention: [First Initial Lowercase][Middle Initial][Last Name Lowercase]
-
Example: jadoe
-
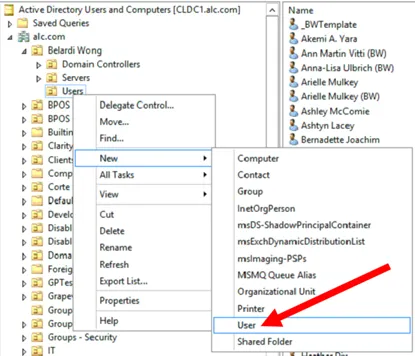
On “BW-NOC-DC1” or “BW-NOC-DC2” within Screenconnect/NCentral, open Active Directory (AD).
-
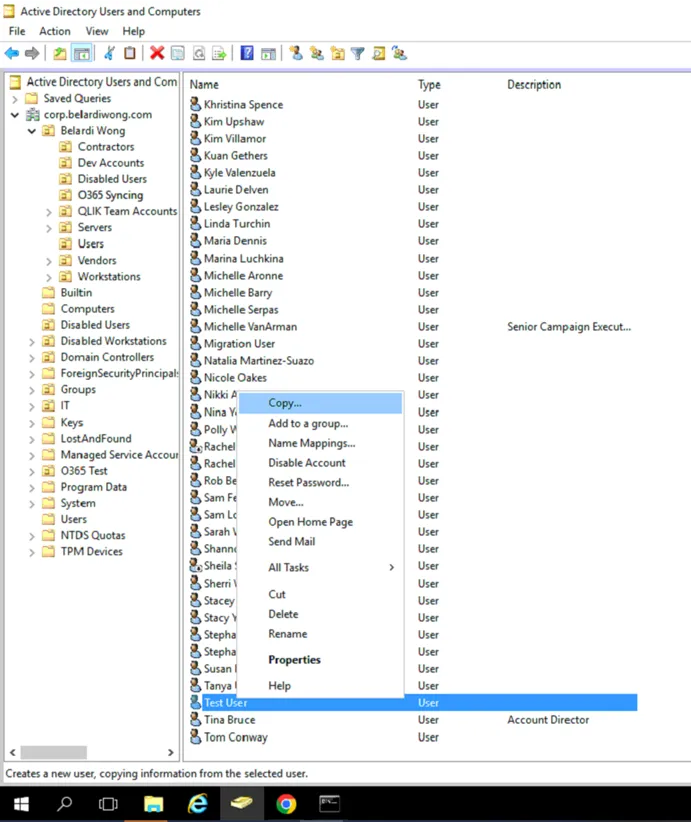
Each new user should have an “Assigned Buddy” which is the user you will copy in AD. Locate the Buddy, right click on their name and hit “copy”
- If the Buddy’s account does not let you copy, right click the OU and select New > User. You will need to manually copy each Security Group. Unless specified, new users will be created in the corp.belardiwong.com > Belardi Wong > O365 Syncing OU.
 4. Review Step 3 when creating the Username.
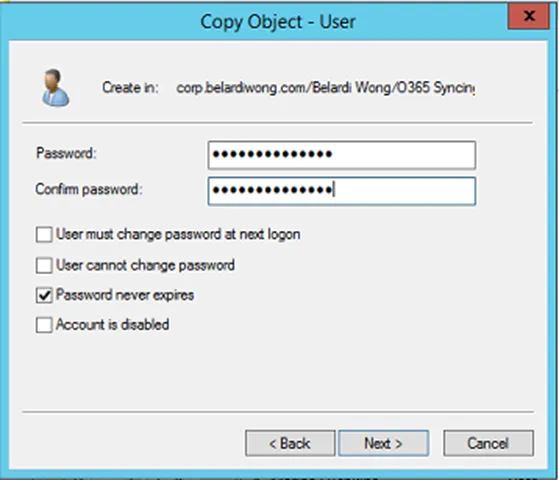
- Use the format of [BELARDI][Year][User First/Last Initials][!] when creating the user’s password.
-
Example: BELARDI2022jd!
-
Hit next, then finish once completed.
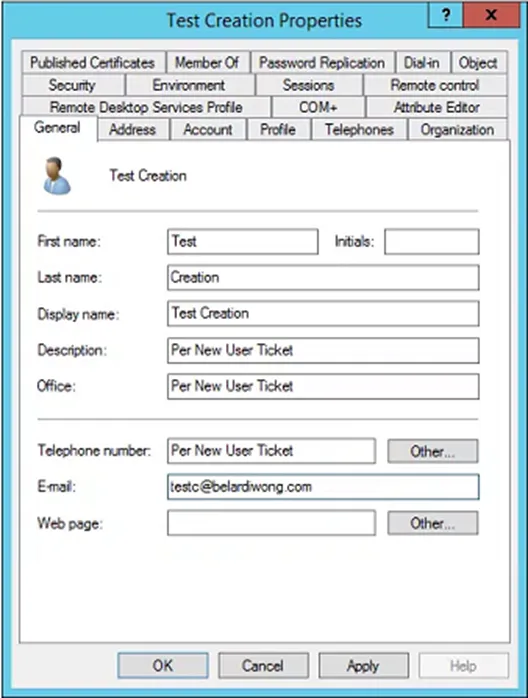
 6. Open your newly created user within the OU you just added them to, then go to the General tab.
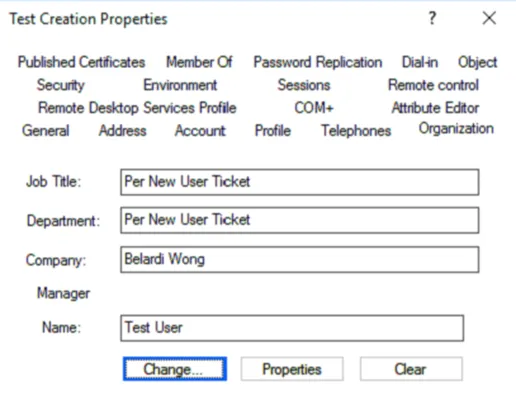
- IMPORTANT: Fill out the General tab with provided information in the new user ticket, if unavailable, leave blank. Ensure the email box has been adjusted to a firstl@belardiwong.com format. Hit Apply.
- Go to the Organization tab. Update with provided information on new user ticket, if unavailable, leave blank. Hit Apply.
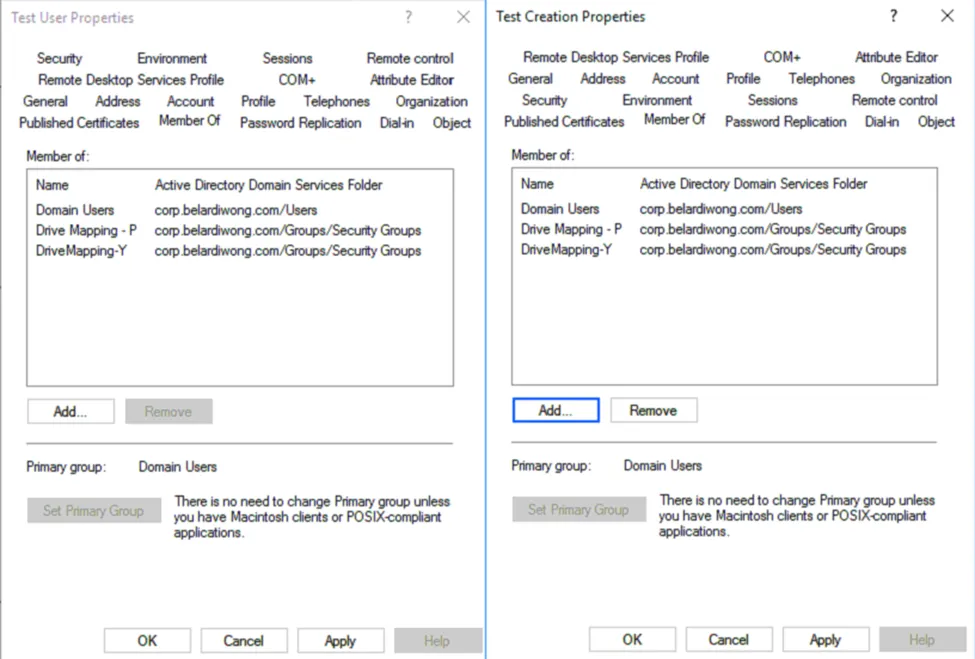
- Go to the Member Of tab. Also, open the Buddy’s AD Profile side by side with your new user. Compare and verify all Security Groups have been added (From Buddy, not groups listed in photo). Add all additionally requested groups. Hit Apply.
- IMPORTANT: Confirm/Add user to Drive Mapping - P Security Group (this will ensure they have access to Belardi Wong’s Public P: Drive)
-
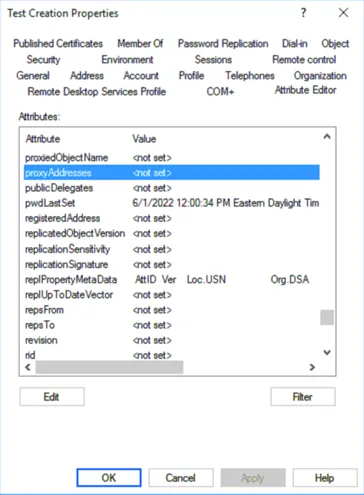
Go to Attribute Editor tab. Locate Proxy Addresses and open it.
-
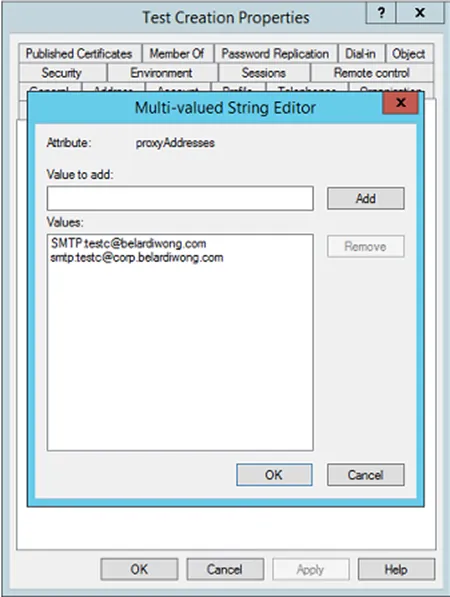
Add both variations of email to the smtp list below, Hit OK, then Apply.
-
SMTP:firstl@belardiwong.com
-
smtp:firstl@corp.belardiwong.com
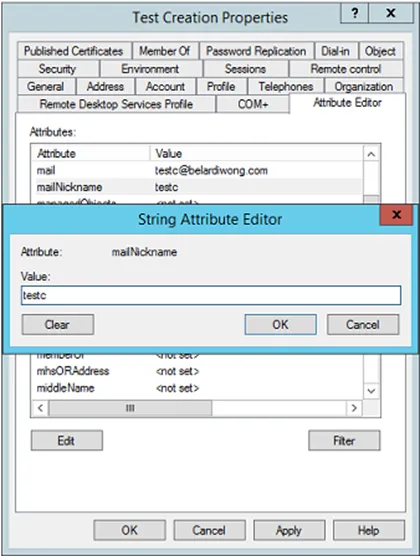
 12. Once back to Attribute tab, locate mailNickname. Then update it to “firstl” format. Hit OK, Apply, then OK to close out of this user’s AD profile.
- Open up Powershell as Admin, run AD Sync Command on BW-NOC-AADSYNC1
-
Start-ADSyncSyncCycle -PolicyType Delta -
NOTE: If erroring out, wait the 30 minute sync time for 365
-
Log onto Portal.office.com with centrexIT’s Belardi Wong Global Admin Account (Reference Requirements Section). Then go to the Admin Center.
-
Under Users, Select Active Users and locate your new user. Open up their profile and assign a “Business Premium” License. If one is not available, reach out to Dylan Quiros. If DQ is not available, please reach out to a lead. Once applied, hit save changes.
-
Add user to the “Belardi Wong All” Distribution List (belardiwongall@belardiwong.com) Admin Center > (Show All) > Exchange > Recipients > Groups
- Reference New User Ticket and add user to all requested Distribution and M365 Groups. Including their internal Intranet. Reference KB: KB00001746
- Add user to Belardi (Security) Pilot to ensure new user will have access to Belardi Wong VPN
-
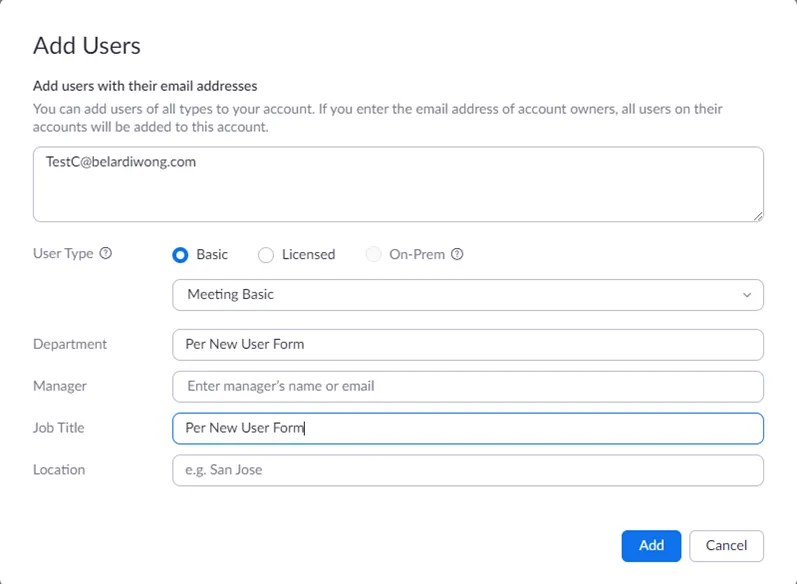
All new user’s get a Basic Zoom Account set up, unless specified to add a license on the new hire ticket. If a license is needed, but not available, please update vITM for the appropriate POC to reach out to.
-
Log onto Zoom Admin Console, credentials are provided in PWState Adstra > Website > Zoom Admin Console
-
Under User Management > Users > + Add Users
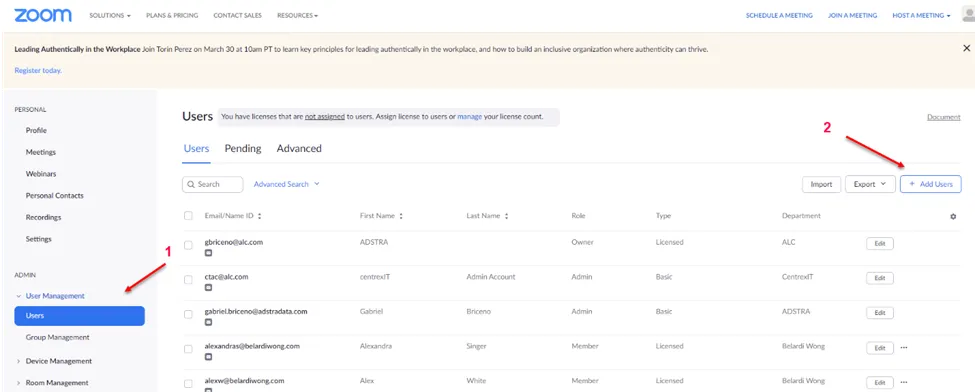
-
Add the user’s email address in the first box. Set to Basic User type unless specified otherwise. Hit Add. User will be sent an email to set up account / select password.
-
Now create an Adstra Active Directory account. Within Screenconnect/NCentral, connect to the “CL-DC01” or “ADSTRA-DC2”.
-
Within Adstra’s AD, open up the OU path of: alc.com > Belardi Wong > Users
- Unless specified on the new user request, you do not need to fill in any additional fields. Domain for this server should be @adstradata.com.
- IMPORTANT: Username will keep the “flast” format (eg jdoe) or conflict convention (eg jadoe). Reference Step 3.
- Login to Adstra’s M365 Tenant with their GA account to create an email contact for the new Belardi Wong user.
- office.com (adstradata.com) > Admin Center > Exchange > Recipients > Contacts > Add a mail contact
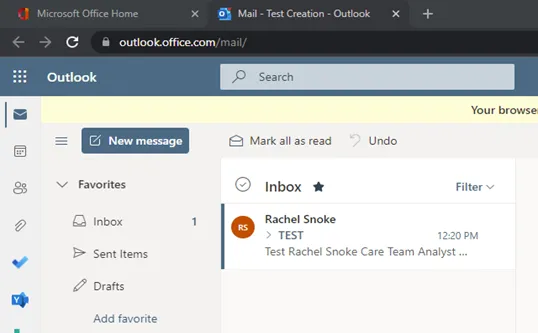
 25. On your computer, log into the new user’s account on portal.office.com via an incognito tab, then select Outlook on the left-hand side. Send yourself a test email from the user’s account, then reply to test mailflow. Once confirmed, delete your test emails within their account. Empty Deleted items bin as well.
-
All additionally listed programs in the New User Ticket, please refer to PC or PBA KBs
-
User Account Notification: Please provide a public update to the Touchbase ticket once the account and mailbox are created by COB Wednesday (prior the New Hire Start Date) but DO NOT send the credentials, these will be given to the New Hire during their IT Touchbase call.
- IMPORTANT: If the above cannot be performed by COB Wednesday, contact vITM and vCIO immediately.
- Computer Tracking Guidance: Please put the tracking information into the public notes of the Touchbase ticket AND send an email to the personal email address listed in the onboarding ticket so the end-user has their computer tracking info and can plan arrival accordingly.
- IMPORTANT: If we cannot 2-day ship the device to be delivered to the end-user on Friday prior to a Monday start date, notify vITM and vCIO immediately.
- New User ticket can be closed once communications are sent out.
Note: You should not be selecting “change password upon next login” when creating your initial password. This is because we provision their computers and assist with the user’s first-time login. Whoever assists with the user touch base, should do a walkthrough of how to reset a password.