The intended purpose of this document is to give a general overview of the process. It is not client specific and may not match up completely with any specific client environment. This article will assist with the renewal of a GoDaddy signed certificate in a RDGateway environment that contains a Gateway server. This process assumes the certificate has not yet already expired (however the process will be the same). Disclaimer, PCSD was used as the template for the purpose of taking screenshots.
Part 1
1. Sign into the gateway server and open IIS.
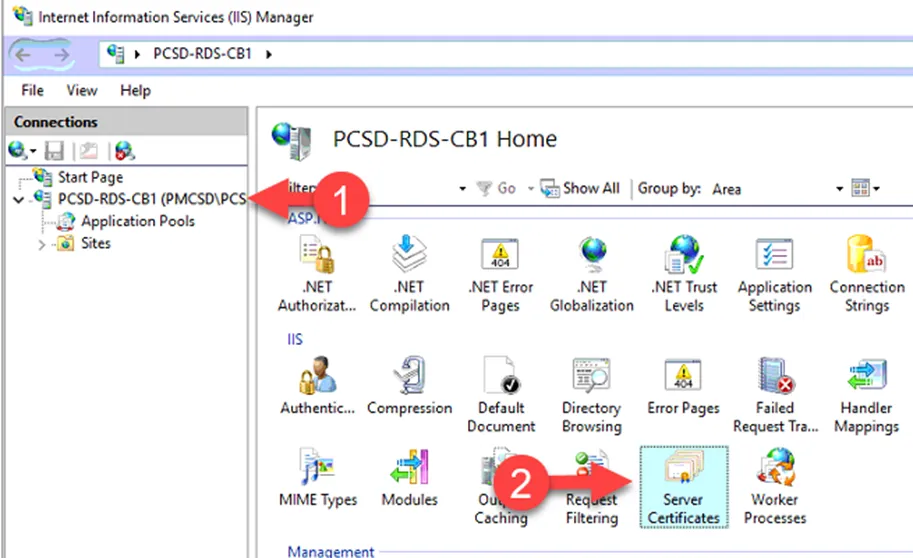
2. Select the server’s name, in this case PCSD-RDS-CB1 and then Server Certificates.
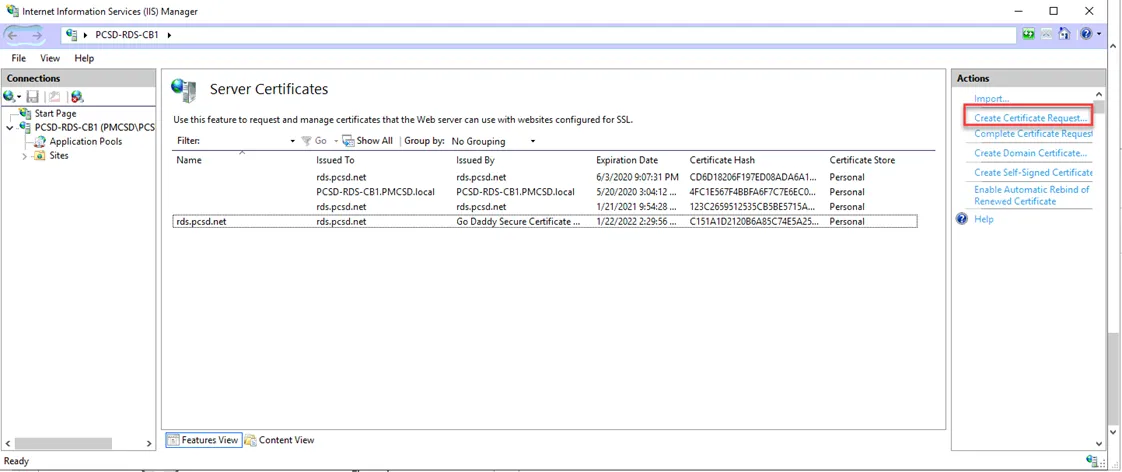
3. Under Actions select Create Certificate Request. Our goal is to make a new CSR and rekey the original SSL in Godaddy. The follow steps will accomplish this.
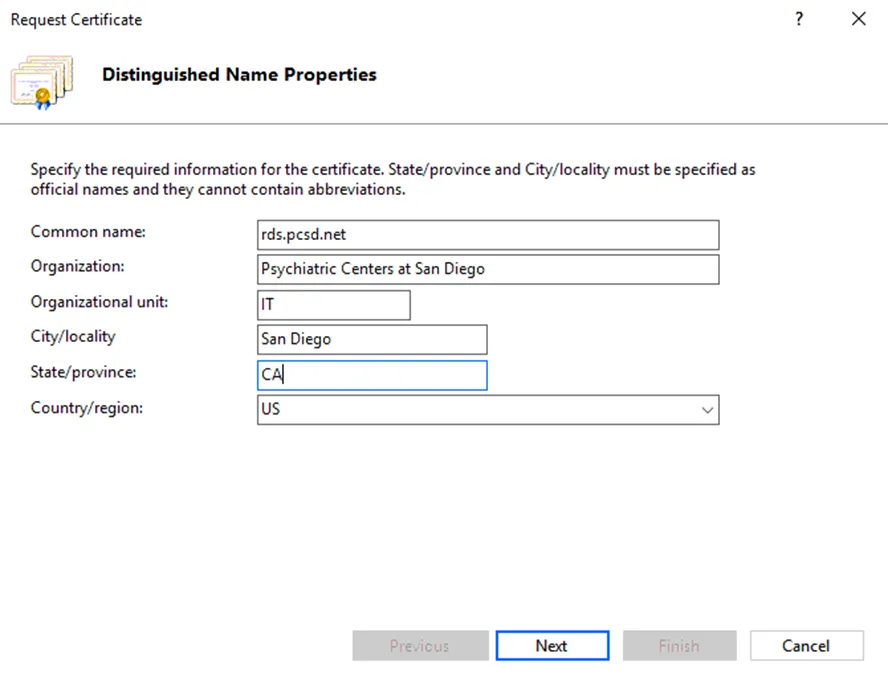
4. Fill out all the form fields. Be sure to use the name of the SSL for the Common Name. The rest you can follow as a general guide of what to type in. Once done choose Next.
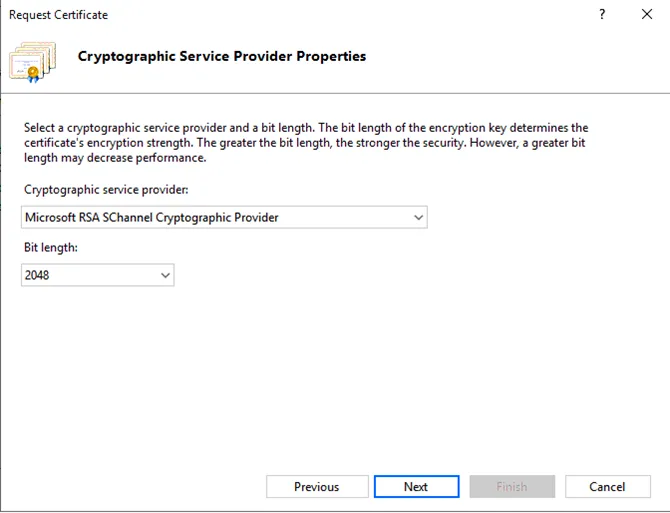
5. Select Microsoft RSA SChannel Cryptographic provider, this should be the default option. Then change the Bit Length to at least 2048.
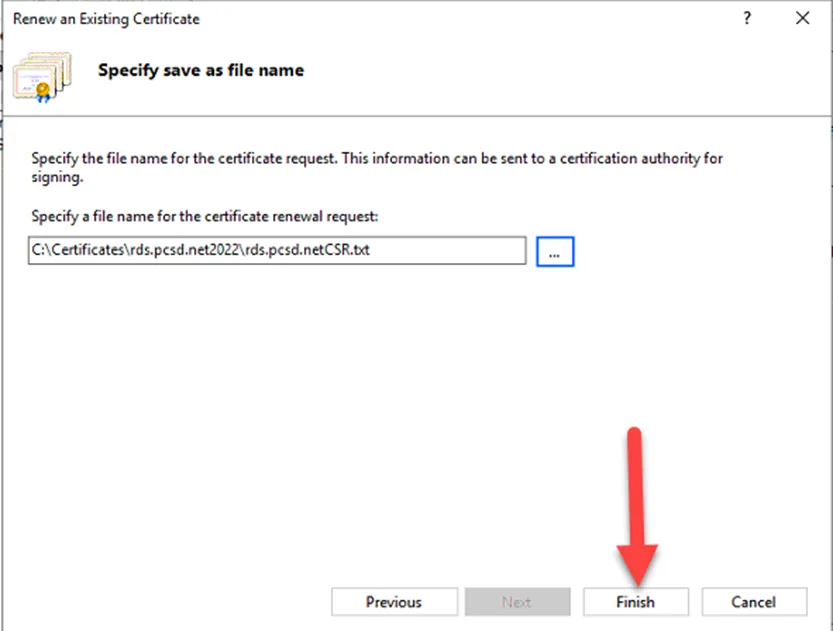
6. Select the … to browse to a location to save your CSR (certificate signing request). We will want to save it in C:\Certificates. Make a new folder to house the files for the renewal. In this case rds.pcsd.net2022. Select Open and then Finish.

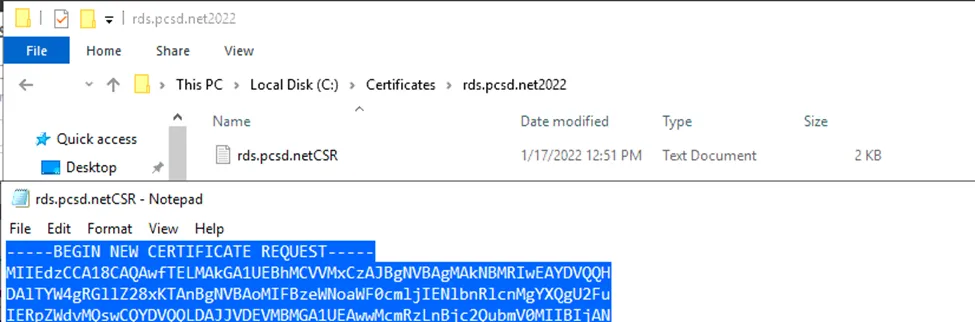
7. Browse to the location to where you saved your CSR and then open the .txt file. Copy all the contents to your clipboard.
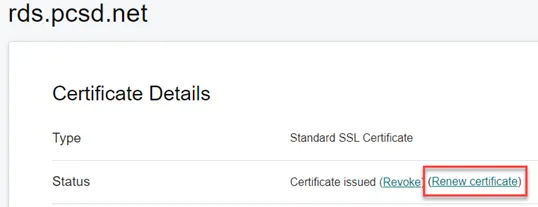
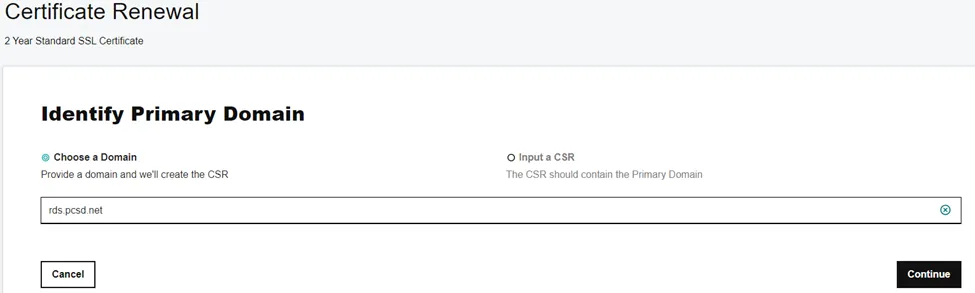
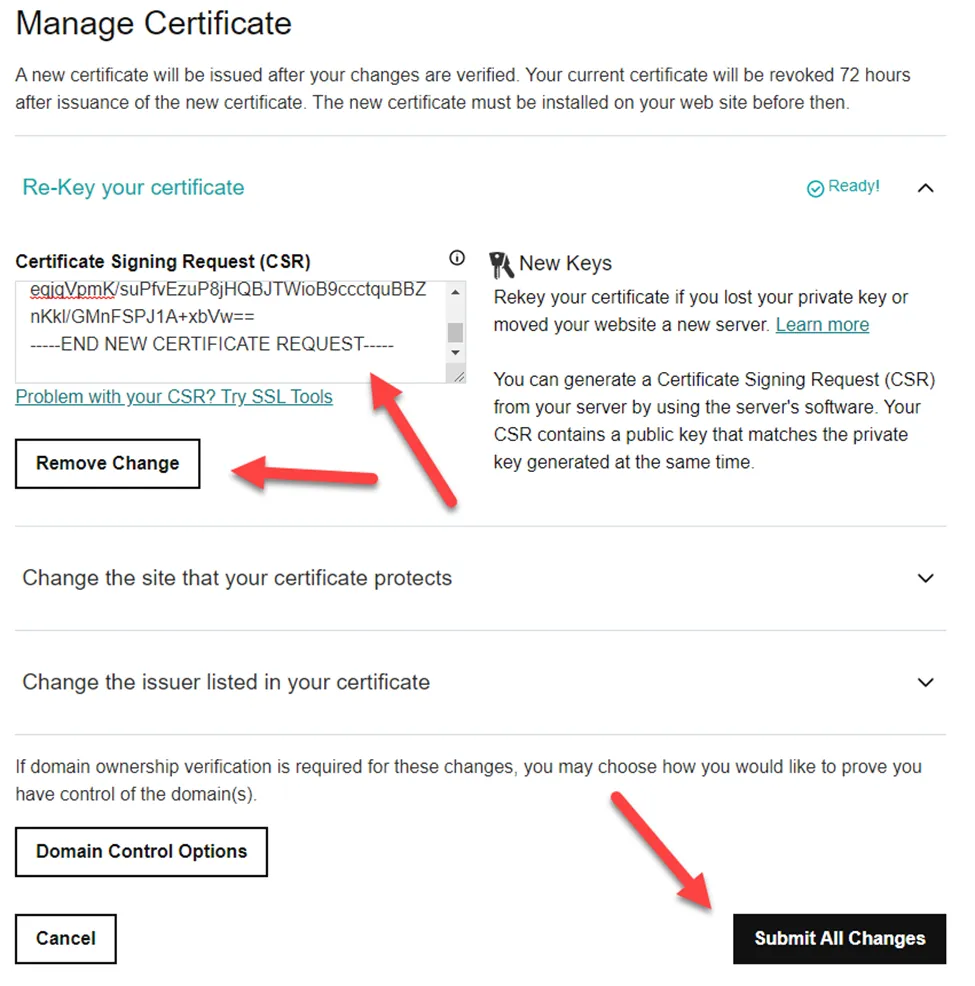
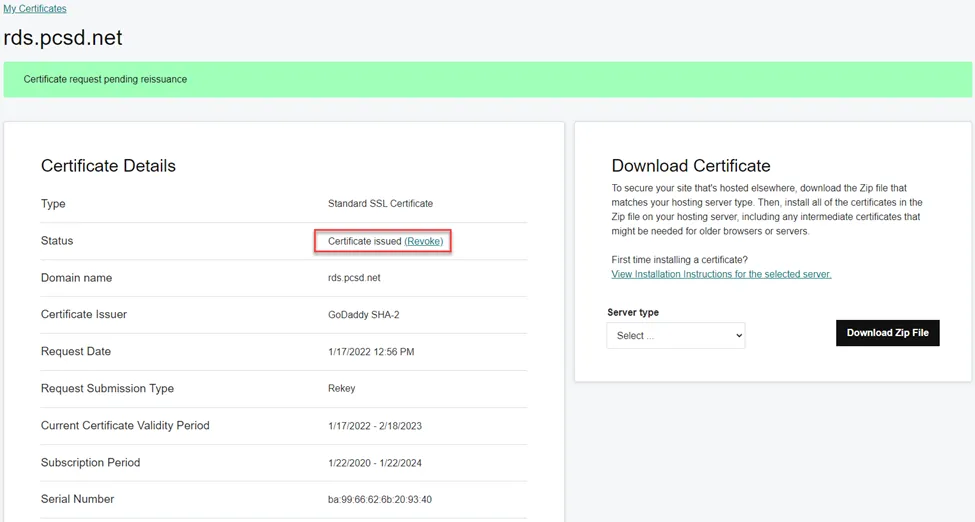
8. Now that we have the CSR, we need to go into GoDaddy to rekey. Sign into Onelogin and choose GoDaddy. From there select the Icon with the nine squares next to My Account and Choose SSL Certificates. In the Search Domains box type in name of the certificate you are looking for and select the SSL in the darker grey box. *STOP* - See step A below. If no renewal is needed then croll down to the middle of the page and beneath Manage Certificate choose Re-Key your certificate. In the box that says Paste your CSR here, paste in the contents of your clipboard from earlier and select Add Change. Now select Submit All Changes.
A. **Optional Step**
While on the GoDaddy portal if you see the notice that your SSL needs renewal. You will need to do this before you rekey.
B. Select Choose as Domain and paste in the contents of your clipboard from earlier and select Continue. Save both the Private Key and CSR to a file and select Continue.
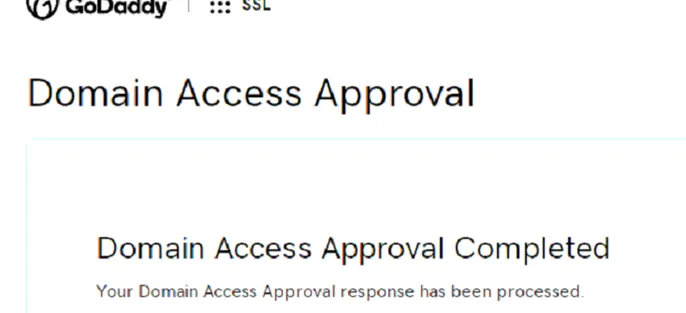
C. Next decide how you want to verify. You can use the top box to select an email address which you have access to. An email will come in from donotreply@godaddy.com with the subject line Domain Access Verification. Inside will be a link which you can use to approve. The other option is to use the bottom box. Godaddy will email you instructions along with a TXT value which you will need to manually create in the DNS zone file for your specific domain. See https://in.godaddy.com/help/verify-domain-ownership-dns-or-html-for-my-ssl-certificate-7452?locale=en for more information.
D. One verified you will see this:
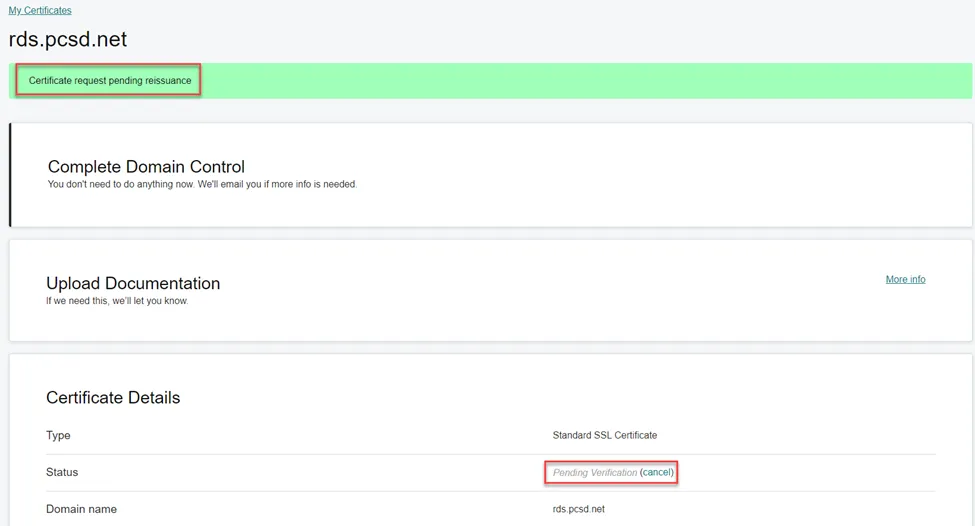
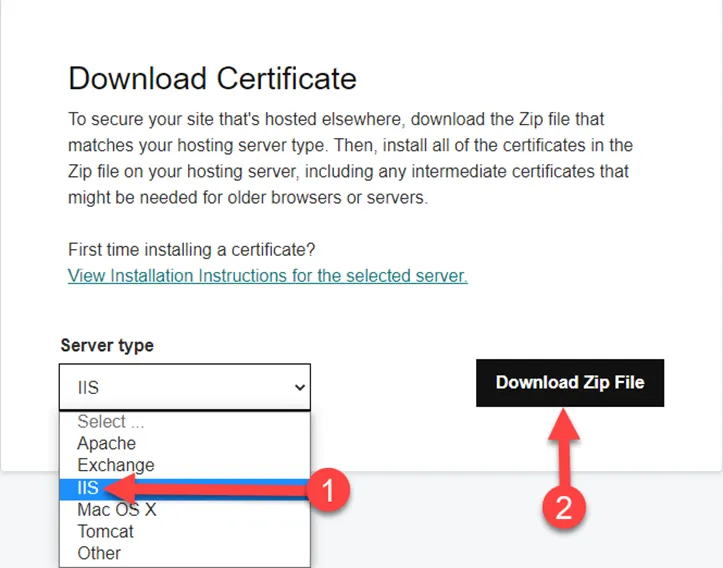
9. Once submitted, you will be taken to a new window which states Certificate request pending reissuance. If you notice the Status box, it says Pending Verification. Give it 30-60 seconds then refresh your browser. More than likely it will be done. Once done the Status box will say Certificate Issued. Now look to the right and select the Server type dropdown and choose IIS. Select Download Zip File.
10. Save the zip file to the same C:\Certficates folder from earlier and extract.
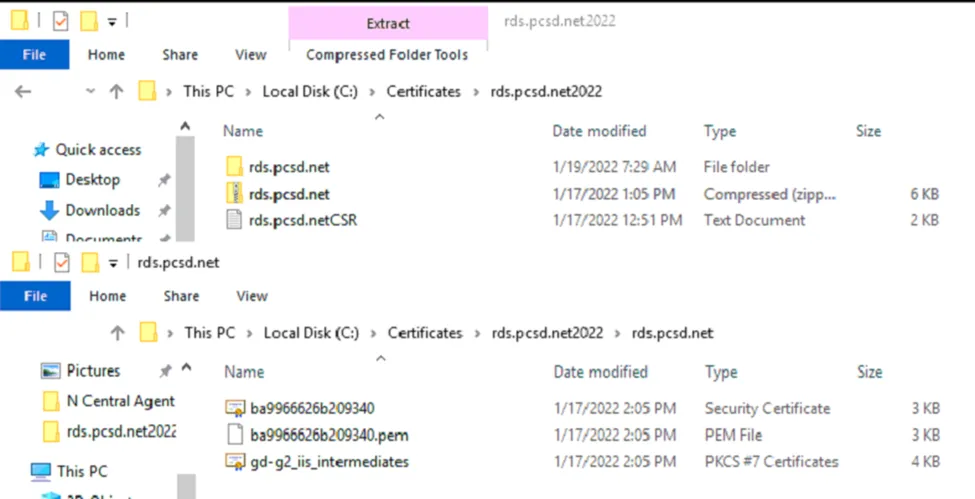
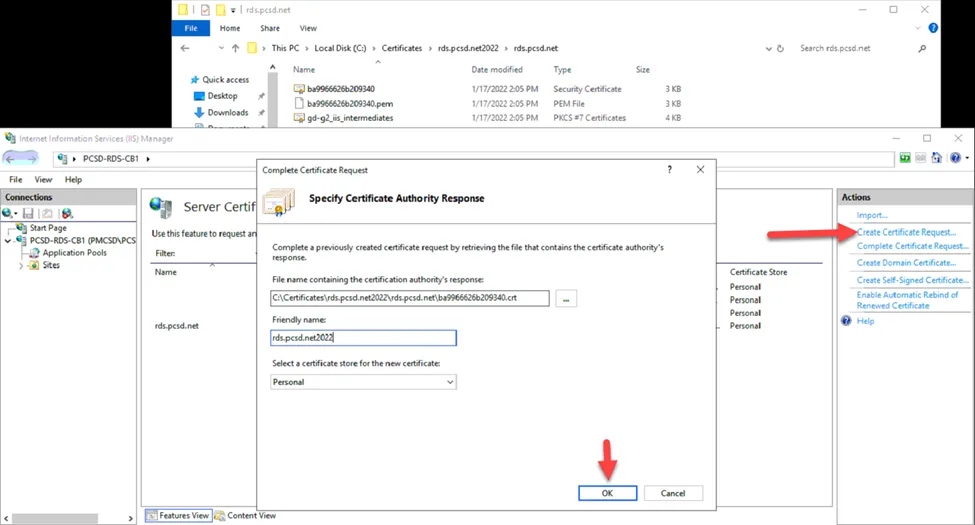
11. Next go back into IIS to Server Certificates and now select Complete Certificate Request… In the first part, select the three … and browse to your .CRT file. If no files are listed, select the file type box on the lower right and change it from *.cer to *.* Select the file with the letter and numbers similar to the example image. Then give it a Friendly Name, this can be whatever you want. Then select the Personal certificate store option. Once done select OK.

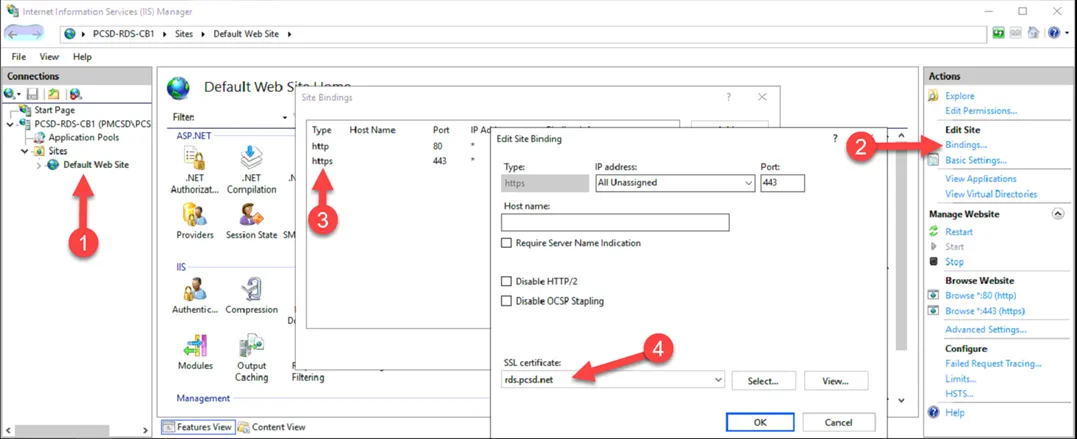
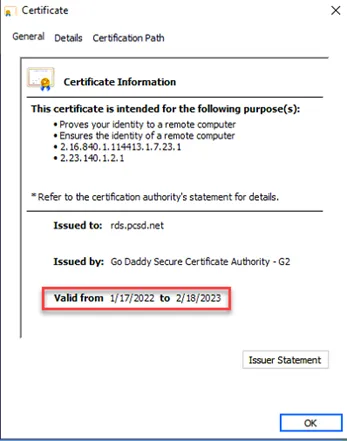
12. Next, within the same IIS window, select Sites on the left and then Default Web Site – Edit Site – click https and then select the SSL Certificate drop down and choose your new certificate. If you are not sure which it is (if you see duplicate names), pick one then click View… and use that to check the Valid from date to make sure it is what you expect. If you see the expected date, then you have selected the correct one. Click OK when done then Close the Site Bindings window.
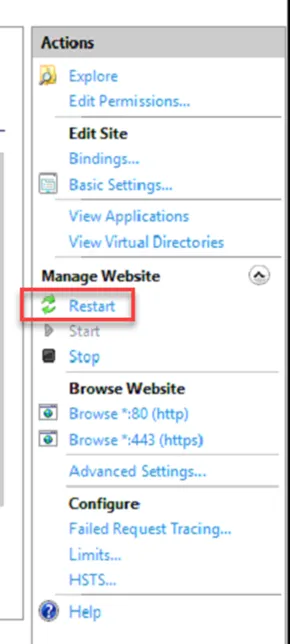
13. Now select Restart under Manage Website.
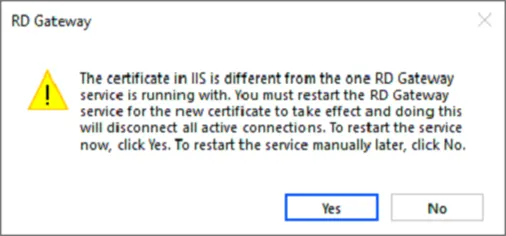
14. Next open the RD Gateway Manager. You may see this notification. If you do, you will need to click yes. Doing so however will boot all active connections. Be sure to get an agreed upon time frame before doing so with the client.
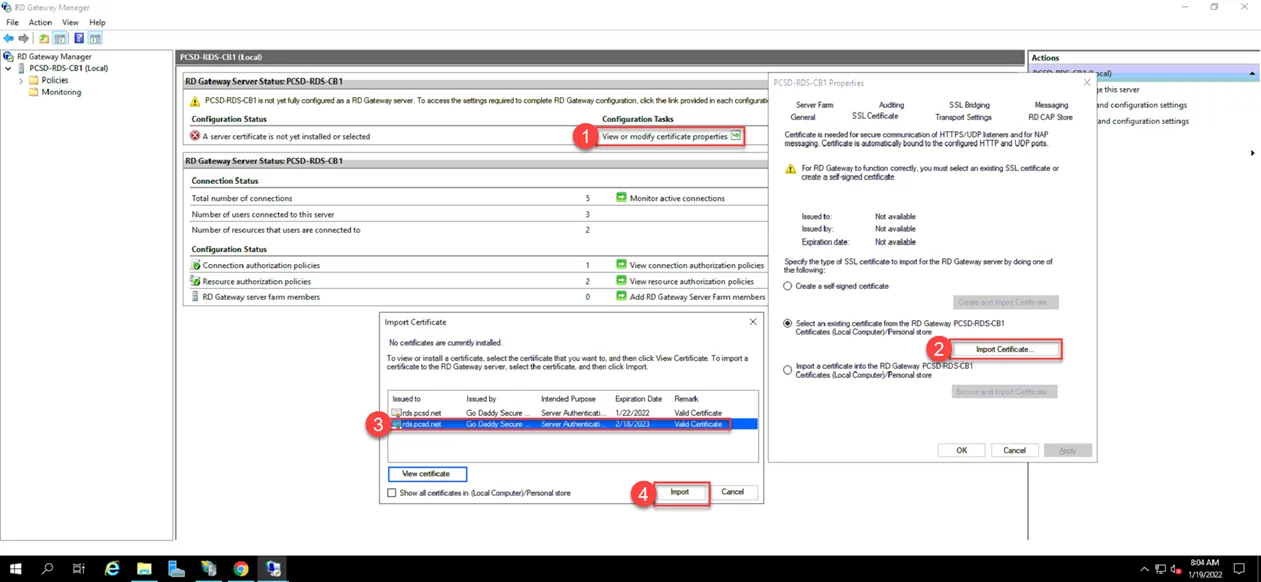
15. If you are ready now, select Yes. If not, then choose No. When ready you can reference the following to import the new SSL in to the RDGateway. Select View or modify certificate properties – Import Certificate – select your new SSL (reference the expiration date if you are not sure) then select Import then Apply and OK then select Yes to disconnect any active sessions.
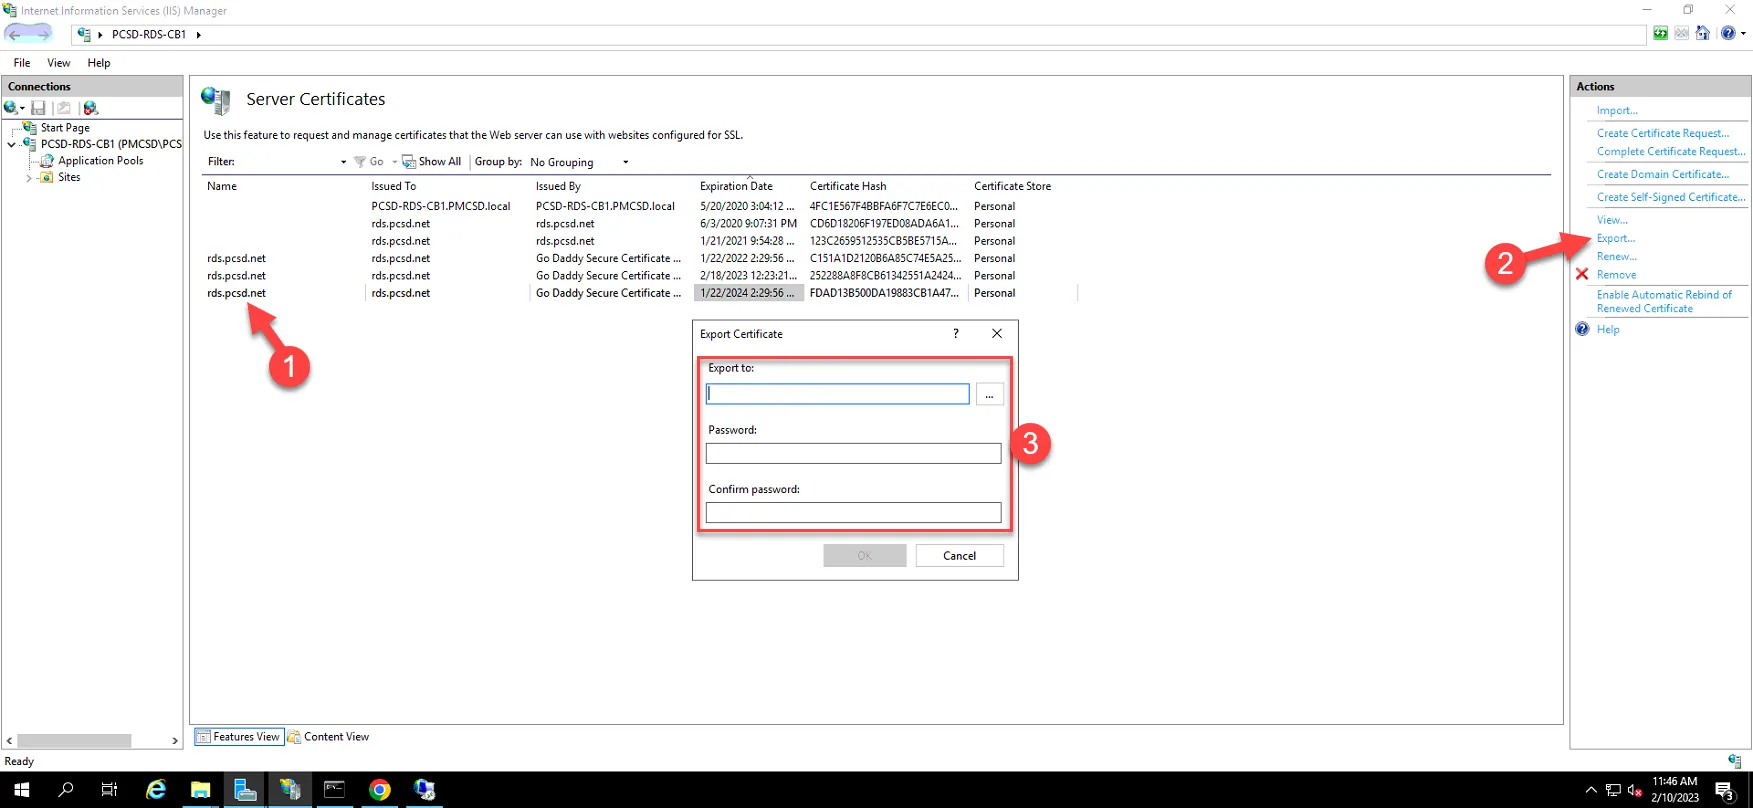
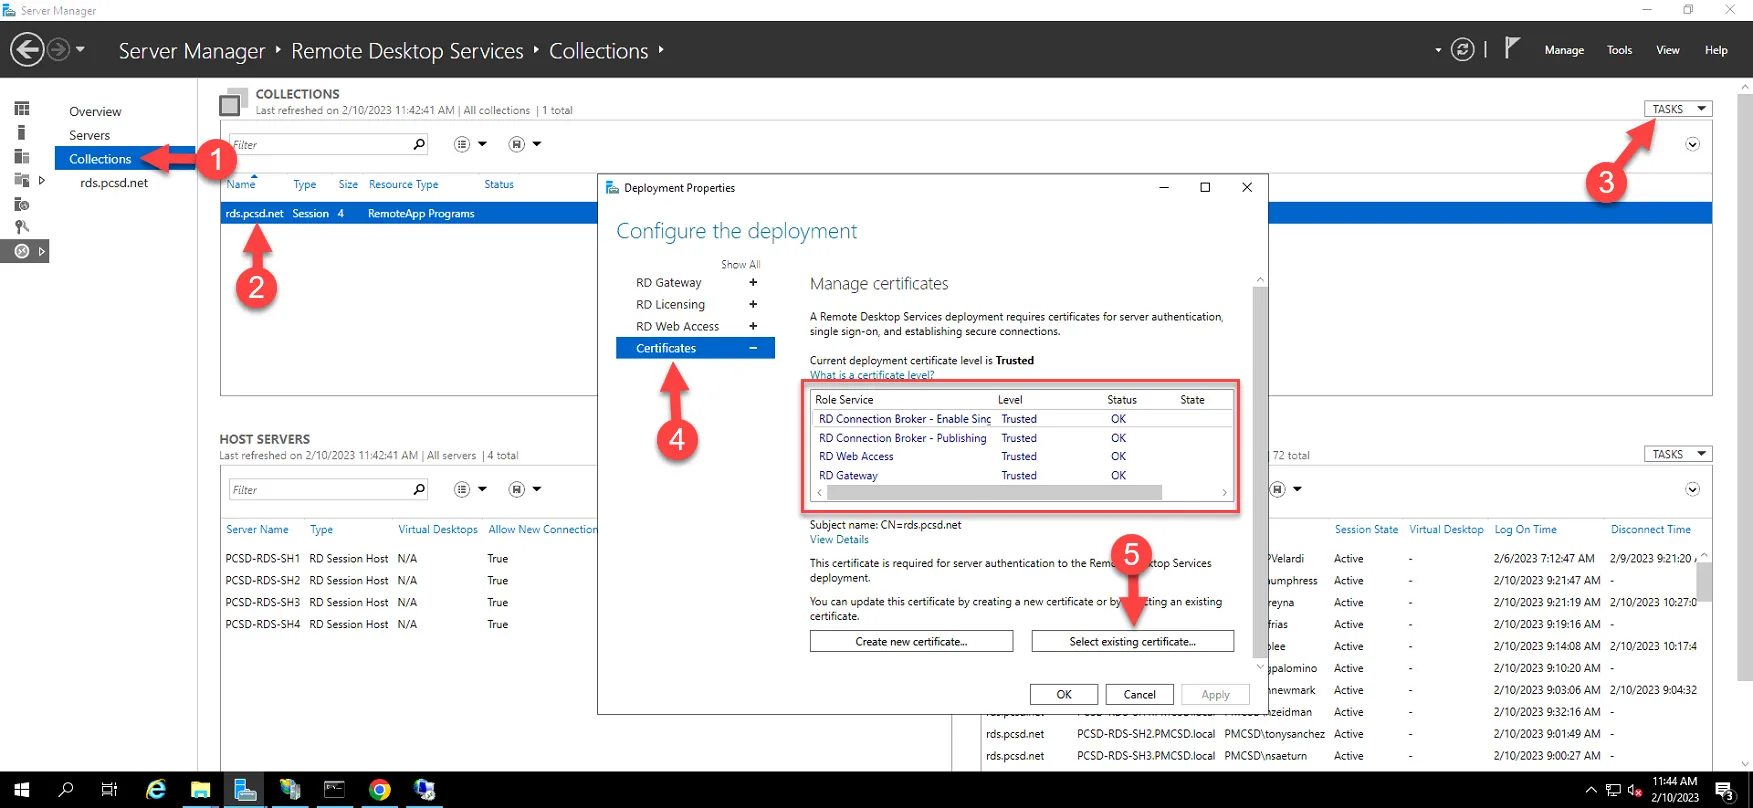
16. Next we need to update the deployment properties with the new certificate. First we need to export it from IIS into a PFX format. Go into IIS, select the new certificate and pick Export. Choose a location such as C:\Certificates, generate a password from PWstate and save. Next go to Server Manager - Collections - *connection name* - Tasks - Edit Deployment Properties - Certificates. Next pick a Role Service and then Select existing certificate… , Choose a different certificate, browse to the one you saved and enter the password from earlier and check the “allow the certificate to be added…” check box and hit Ok, Apply. Do this for all 4 entries.
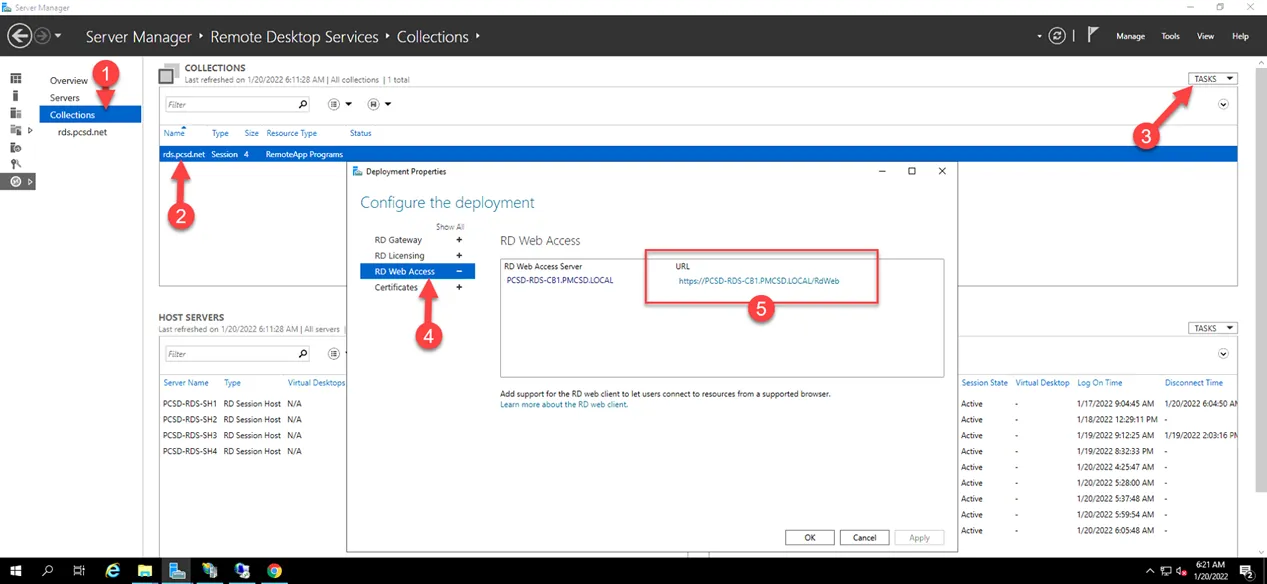
17. Next browse try browsing to the localhost site. If you are not sure how to find it. From the Gateway server open Server Manager – Collections and select the Collection, in this example, rds.pcsd.net. Then chooses TASKS and Edit Deployment Properties. Next choose RD Web Access and there on the right you will see the URL for the localhost site.
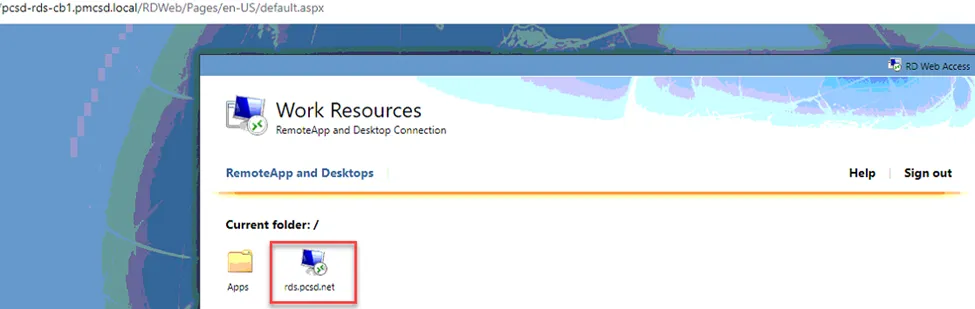
18. Now browse to your site and then download the RDP file. You will need to login first.
19. Check and verify too your SSL has the date you expect. In this case being localhost, it will not be secure. So do not worry. Select where it says Not Secure, select Certificate is not valid and under Valid From you will see the expected date.
20. Finally, test your icon. Connect to the VPN (if remote) and open the icon and sign in. If it works without issue. You have successfully updated your RDP file when signing with Godaddy and utilizing and RDgateway server.
Part 2 (optional)
Part two of this guide describes how you can mass deploy this newly created icon via NCentral.
1. Sign into ncentral.centrexit.com.
2. Select the applicable company from the top left drop down menu.
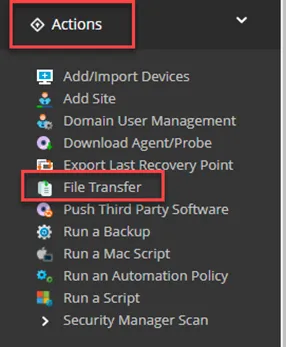
3. On the left-hand menu bar, find Actions – File Transfer
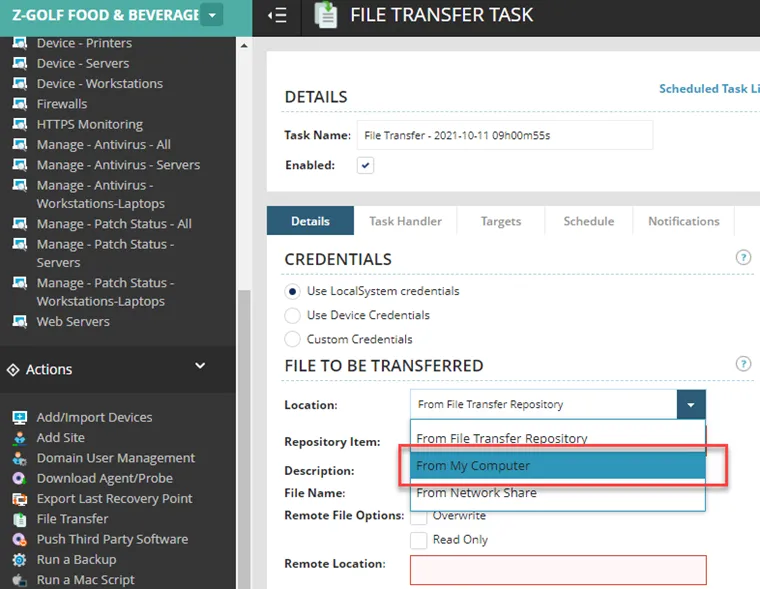
4. Under the Details tab, find Location and check the drop down. You will need the From My Computer option. If you do not have permissions, you will not see this. If that is the case, you will need the NOC team to assist with adding your file to the Repository so you can select it.
5. You will now need to fill out all 5 tabs. Please use the following examples as a template.
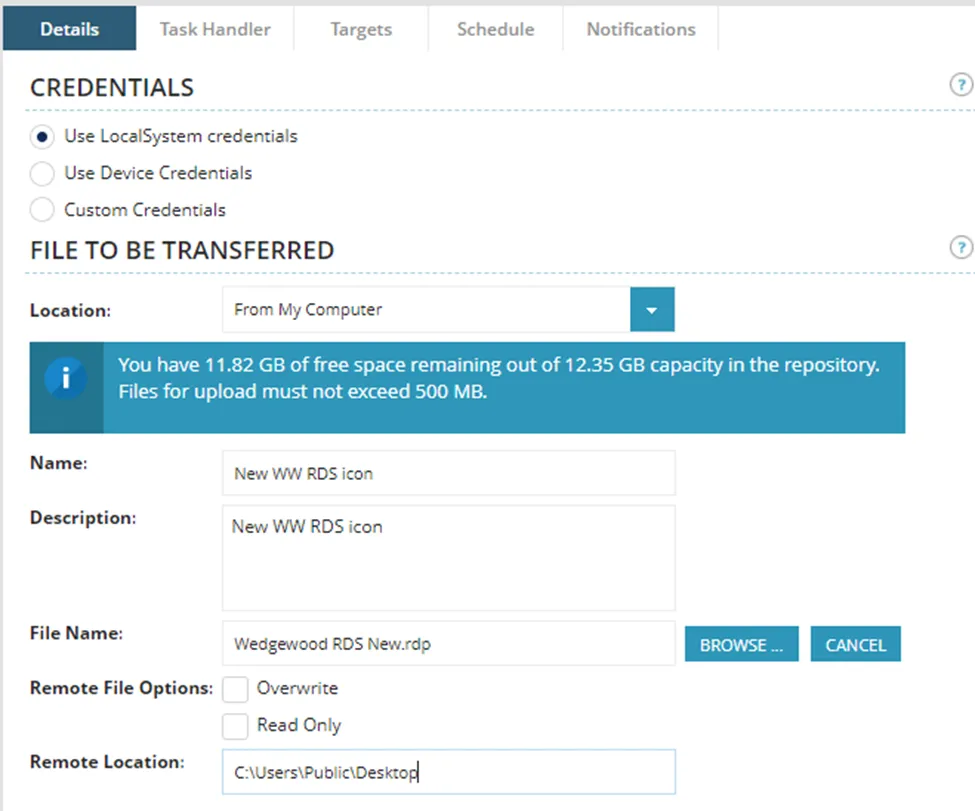
· Note, the public desktop location was picked because the icon needs to be deployed to all end users. This is the only way to target all user desktops via a singular path.
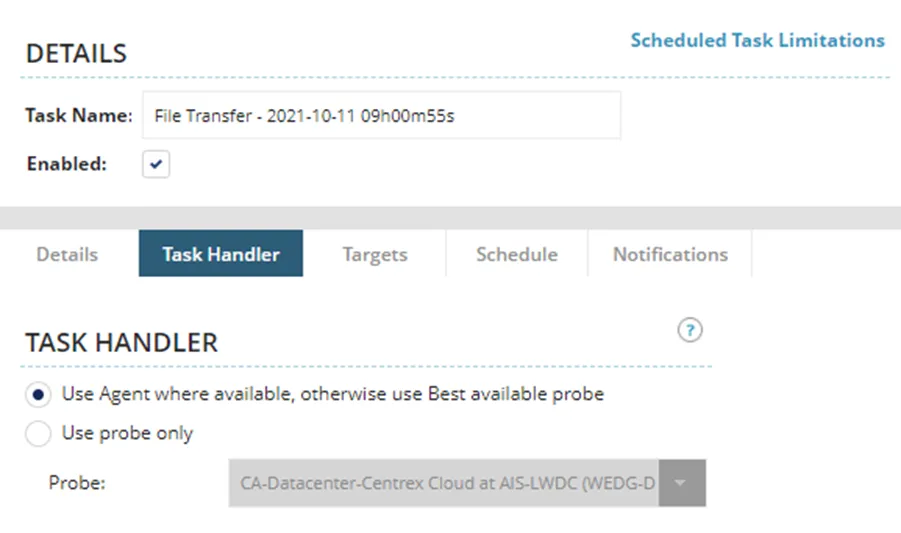
· You do not need to edit anything here.
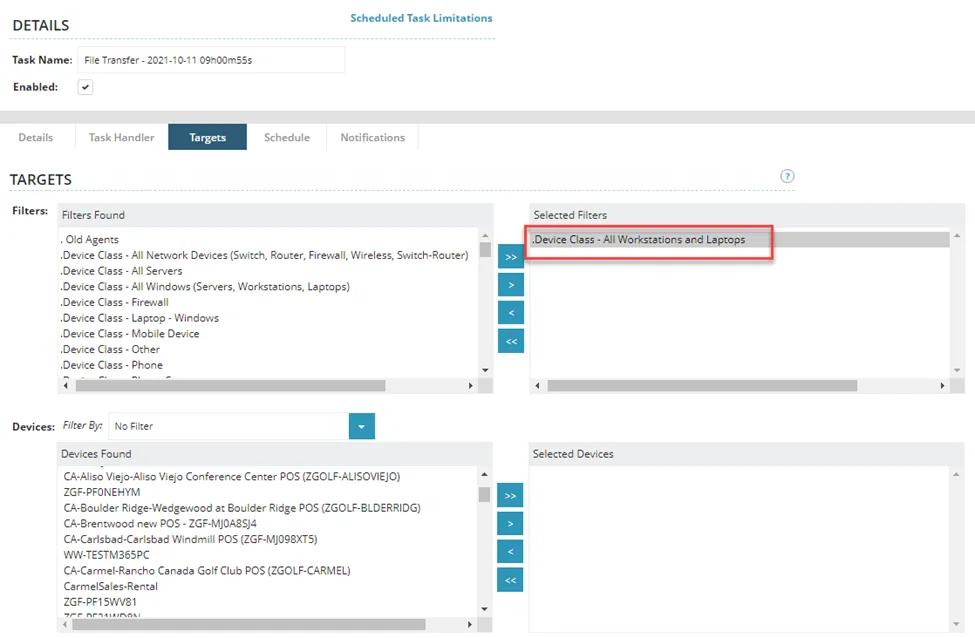
Here is where you designate a target for the device(s) you want to apply your new shortcut too. If you are targeting all workstations and laptop (basically all end user), it will be easiest to use the Device Class filter. In this case Device Class – All Workstations and Laptops. You can also use other Device Classes to select individual devices using the bottom left box.
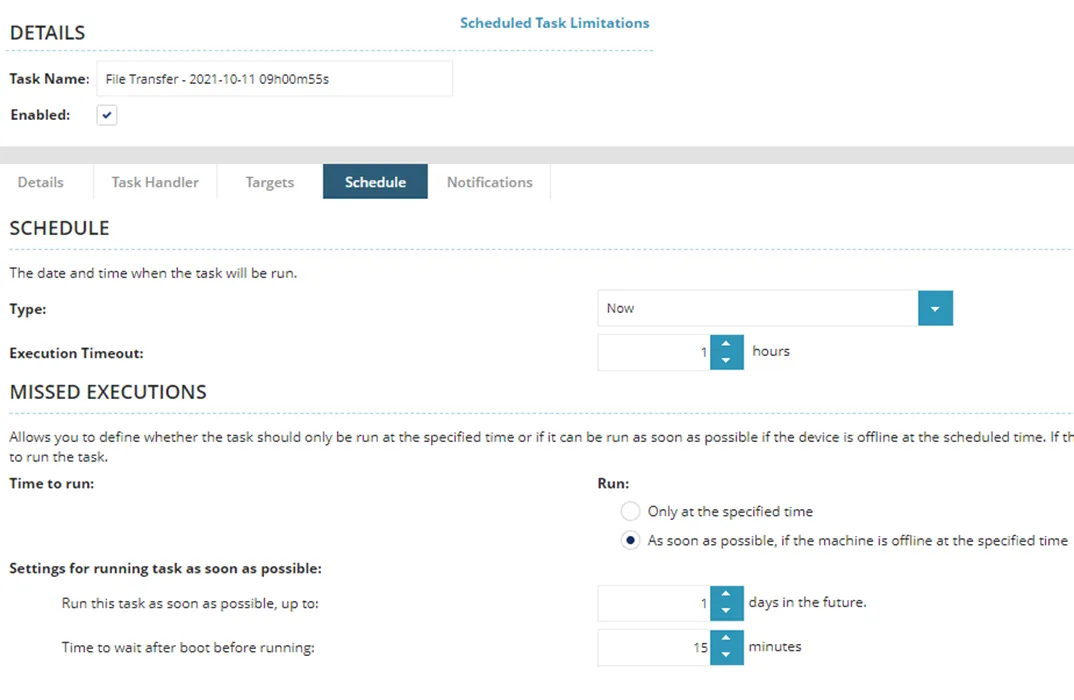
· Leave the type and execution time outs on the default Now and 1-hour selections. Under Missed Executions, you may want to select As soon as possible… bubble and then set the bottom two selections to your preference. This will re-run the task if a computer is powered off at the time of the initial execution. It will attempt to re-run the task during the specified time frame.
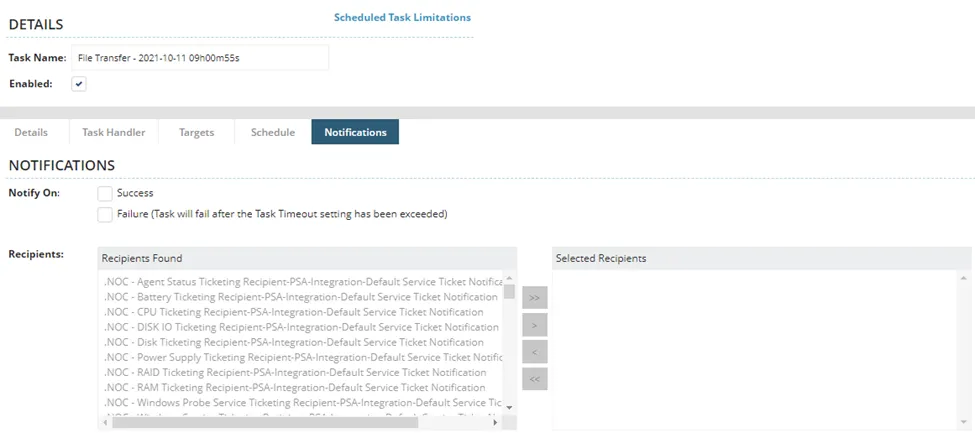
· Here you can specify who you want to email upon the success or failure of the task. Select either one or box boxes and then find your desired recipient under the left side box and select the right facing arrow to add it.
6. Once you are satisfied with your selections, press the green save button on the lower left of your window. This will save the task and begin the execution process. On the following page you can view the progress.